How To Make A Table Runner And Matching Placemats
Creating a table runner and matching placemats is a rewarding DIY project that allows for the personalization of dining spaces. It provides an opportunity to select fabrics and patterns that complement existing décor, adding a touch of handmade elegance to the table setting. This article outlines the steps involved in crafting these items, from material selection to the final finishing touches.
The process, while seemingly simple, demands attention to detail and a methodical approach to ensure a professional-looking finished product. Accurate measurements, precise cutting, and careful sewing are crucial for achieving the desired aesthetic and functionality. Furthermore, understanding basic sewing techniques will greatly enhance the overall quality and durability of the table runner and placemats.
Key Point 1: Material Selection and Preparation
The first step in creating a table runner and placemats is the careful selection of materials. Fabric choice is paramount, influencing both the appearance and the longevity of the finished items. Considerations should include the fabric's weight, durability, and ease of care. Natural fibers like cotton and linen are popular choices due to their versatility and aesthetic appeal. However, blends that incorporate synthetic fibers can offer increased wrinkle resistance and stain protection. The intended use of the table runner and placemats should guide this decision; for instance, items intended for frequent use may benefit from a more durable fabric.
Beyond the primary fabric, interfacing is a crucial component. Interfacing provides structure and stability, preventing the placemats and table runner from becoming limp or misshapen. It is typically a non-woven or woven fabric that is fused or sewn to the back of the main fabric. The type of interfacing used will depend on the weight and weave of the main fabric. Lighter fabrics generally pair well with lightweight interfacing, while heavier fabrics require a sturdier option. Fusible interfacing is convenient, as it can be ironed onto the fabric, but sew-in interfacing may offer greater longevity and a softer drape.
Thread selection is another critical aspect. The thread should be of a similar fiber content to the main fabric and a complementary color. All-purpose polyester thread is a suitable choice for most projects, offering good strength and colorfastness. However, for more delicate fabrics, cotton thread may be preferred. It is advisable to test the thread on a scrap of fabric to ensure compatibility and to avoid any potential staining or discoloration.
Before beginning any cutting or sewing, the fabric must be properly prepared. This typically involves washing and drying the fabric to pre-shrink it and remove any sizing or finishes. This step is essential to prevent the finished items from shrinking or warping after they are washed. Ironing the fabric is also critical to ensure a smooth, even surface for cutting and sewing. Any wrinkles or creases can distort the measurements and result in an uneven finished product.
Key Point 2: Cutting and Sewing Techniques
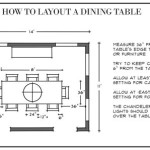
Accurate cutting is essential for achieving a professional-looking table runner and placemats. Precision in this stage translates directly to the overall symmetry and balance of the finished items. Begin by taking precise measurements for both the table runner and placemats. The dimensions of the table runner should be proportional to the table size, typically extending beyond the edge of the table by 6 to 12 inches on each end. Placemats typically measure around 12 inches by 18 inches, but these dimensions can be adjusted to suit personal preferences and table size.
Once the measurements have been determined, use a rotary cutter, a cutting mat, and a clear ruler to accurately cut the fabric to size. A rotary cutter provides a clean, precise cut, while the cutting mat protects the work surface and provides a stable base for cutting. The clear ruler allows for accurate measurement and alignment. When cutting, it is important to leave a seam allowance of at least ½ inch on all sides of the fabric. This seam allowance will be used to create a clean, finished edge.
After cutting the fabric, layering is the next step. Place the main fabric right side up, followed by the interfacing, and then another layer of the main fabric right side down. This creates a sandwich of fabric and interfacing that will be sewn together. Pin the layers together securely to prevent them from shifting during sewing. Ensure that the pins are placed perpendicular to the edge of the fabric, approximately every 2 to 3 inches.
Sewing the layers together requires a consistent seam allowance and careful attention to detail. Using a sewing machine, stitch along all four sides of the fabric, leaving a 4- to 6-inch opening on one side. This opening will be used to turn the fabric right side out. Backstitch at the beginning and end of each seam to secure the stitches and prevent them from unraveling. Trim the corners of the fabric at a 45-degree angle to reduce bulk and create sharper corners when the fabric is turned right side out.
Turn the fabric right side out through the opening, carefully pushing out the corners with a point turner or a blunt instrument. Press the edges of the fabric flat with an iron, paying particular attention to the seam allowance around the opening. Fold the seam allowance of the opening inwards and press it in place. Finally, stitch the opening closed using a blind stitch or a topstitch. A blind stitch is a hand-sewing technique that creates an invisible seam, while a topstitch is a machine-sewing technique that creates a visible seam along the edge of the fabric.
Key Point 3: Adding Finishing Touches and Embellishments
The addition of finishing touches and embellishments can elevate the appearance of the table runner and placemats, adding a personalized touch and enhancing their visual appeal. These details can range from simple edge treatments to more intricate decorative elements.
One common finishing touch is the addition of a decorative stitch around the edge of the table runner and placemats. Many sewing machines offer a variety of decorative stitches that can add texture and visual interest. A simple zigzag stitch can create a clean, finished edge, while more elaborate stitches like scallops or floral patterns can add a touch of elegance. When using a decorative stitch, it is important to test it on a scrap of fabric first to ensure that it is compatible with the fabric and thread.
Another popular finishing touch is the addition of binding or trim. Binding is a strip of fabric that is folded and sewn around the edge of the table runner and placemats, providing a clean, finished edge and adding a pop of color or pattern. Trim can include lace, ribbon, or other decorative elements that are sewn or glued to the edge of the fabric. When adding binding or trim, it is important to choose materials that complement the main fabric and that are durable enough to withstand repeated use and washing. Mitered corners are necessary for a professional finish when applying binding.
Beyond edge treatments, various embellishments can be added to the surface of the table runner and placemats to create a unique and personalized design. Appliqués, which are fabric shapes that are sewn onto the surface of the fabric, can be used to create a variety of patterns and designs. Embroidery, which involves stitching decorative designs onto the fabric, can add texture and dimension. Beading, which involves attaching beads to the fabric, can add sparkle and glamour.
The choice of embellishments will depend on personal preferences and the overall aesthetic of the table setting. When adding embellishments, it is important to consider the durability and washability of the finished items. Embellishments that are securely attached and that are resistant to fading and shrinking will ensure that the table runner and placemats remain beautiful and functional for years to come.

How To Make A Table Runner 3 Easy Diy Runners Treasurie

Beginner Sewing Project Diy Placemats Table Runner Reversible

Beginner Sewing Project Diy Placemats Table Runner Reversible

5 Ways To Decorate A Table With Runner Pottery Barn

How To Match Tablecloth Napkins Runners And Placemats 4 Styles For All Occasions

5 Ways To Decorate A Table With Runner Pottery Barn

In August Pinwheel Star Table Runner Placemats And More The Crafty Quilter

Mixing And Matching Table Runners Placemats

Table Runners And Placemats Guide Crate Barrel

How To Use Placemats Ultimate Style Guide French Affair
Related Posts