How To Sew A Quilted Table Runner
A quilted table runner is a decorative and functional addition to any dining or coffee table. It offers a layer of protection for the table surface while adding a touch of personal style and warmth to the room. Creating a quilted table runner is a manageable project for sewers of varying skill levels, offering an opportunity to practice quilting techniques and experiment with different fabrics and patterns. This article provides a comprehensive guide on how to sew a quilted table runner, covering essential materials, step-by-step instructions, and helpful tips for achieving a professional finish.
Before commencing the project, gathering the necessary materials is essential. These materials typically include fabric for the top, batting for the inner layer, fabric for the backing, thread, a rotary cutter or scissors, a cutting mat, a ruler, pins, a sewing machine, an iron, and optional embellishments such as decorative thread or binding.
The choice of fabric significantly impacts the overall aesthetic of the table runner. Cotton fabrics are a popular choice due to their versatility, durability, and ease of care. Pre-cut fabric bundles, such as charm packs or jelly rolls, can be used to create visually interesting designs. Consider the color scheme and patterns of the surrounding décor when selecting the fabrics. For a more modern look, consider geometric patterns or solid colors. For a traditional aesthetic, floral prints or patchwork designs may be preferred.
Batting provides the insulation and dimension to the quilted table runner. Various batting options are available, including cotton, polyester, and wool. Cotton batting offers a natural feel and is easy to quilt. Polyester batting is lightweight and hypoallergenic. Wool batting provides excellent warmth and drape. The thickness of the batting will influence the overall thickness and texture of the finished table runner. A thinner batting is generally recommended for table runners to prevent them from being too bulky.
The backing fabric serves as the underside of the table runner and should complement the top fabric. A solid color or a simple pattern is a common choice. The backing fabric should be slightly larger than the top fabric and batting to allow for trimming and squaring up the finished quilt sandwich.
Planning and Cutting the Fabric
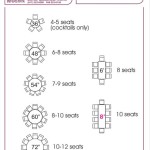
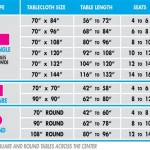
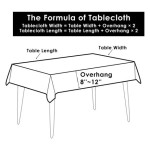
The design of the table runner is a crucial element of the project. Simple designs, such as straight lines or geometric shapes, are ideal for beginners. More complex designs, such as patchwork or appliqué, require more advanced sewing skills. Consider the size of the table when determining the dimensions of the table runner. A general guideline is to have the table runner extend approximately 6-12 inches beyond each end of the table. For a table that is 60 inches long, a table runner that is 72-84 inches long would be appropriate. The width of the table runner is a matter of personal preference, but a width of 12-18 inches is common.
Once the design and dimensions have been determined, the fabric can be cut. Use a rotary cutter, cutting mat, and ruler for precise and accurate cuts. If using scissors, ensure they are sharp and that the fabric is laid flat on a stable surface. Accurate cutting is crucial for ensuring that the finished table runner is square and that the design aligns correctly.
If using multiple fabrics for the top, cut the fabric pieces according to the chosen design. For example, if creating a simple striped design, cut fabric strips of equal width. If creating a patchwork design, cut fabric squares or rectangles of varying sizes. Ensure that seam allowances are included when cutting the fabric pieces. A standard seam allowance of ¼ inch is commonly used in quilting.
After cutting the fabric pieces, arrange them according to the desired design. This allows for previewing the finished product and making any necessary adjustments before sewing. Pin the fabric pieces together to prevent them from shifting during sewing.
Assembling and Quilting the Table Runner
The next step is to sew the fabric pieces together to create the top of the table runner. Use a straight stitch on the sewing machine and maintain a consistent seam allowance. Press the seams open or to one side, depending on the design. Pressing the seams helps to create a flat and even surface for quilting.
Once the top of the table runner is assembled, create the quilt sandwich. This involves layering the backing fabric, batting, and top fabric together. The backing fabric should be placed face down on a flat surface, followed by the batting, and then the top fabric, face up. Ensure that the layers are aligned and that the backing fabric extends beyond the top fabric and batting on all sides.
Use safety pins or basting spray to secure the layers of the quilt sandwich together. Pin the layers every few inches to prevent them from shifting during quilting. Basting spray is a temporary adhesive that can be sprayed between the layers to hold them in place. It is important to use a basting spray that is specifically designed for quilting to avoid damaging the fabric.
Quilting involves stitching through all three layers of the quilt sandwich to secure them together and create a decorative design. Various quilting techniques can be used, including straight-line quilting, free-motion quilting, and stitch-in-the-ditch quilting. Straight-line quilting involves stitching straight lines across the quilt sandwich. Free-motion quilting involves moving the fabric freely under the needle to create intricate designs. Stitch-in-the-ditch quilting involves stitching along the seams of the fabric pieces.
When quilting, use a walking foot on the sewing machine to ensure that all three layers of the quilt sandwich are fed evenly through the machine. A walking foot has feed dogs that grip the top layer of fabric, preventing it from shifting. Adjust the stitch length according to the thickness of the batting and fabric. A longer stitch length is generally recommended for thicker batting.
Start quilting in the center of the quilt sandwich and work outwards to prevent puckering. Maintain a consistent stitch length and tension throughout the quilting process. Periodically check the back of the quilt to ensure that the stitching is even and that there are no skipped stitches.
Binding and Finishing the Table Runner
After the quilting is complete, trim the excess batting and backing fabric from around the edges of the table runner. Use a rotary cutter and ruler to create a clean and even edge. Ensure that the corners are square.
Binding is the process of encasing the raw edges of the table runner to create a finished and durable edge. Binding can be created from a single piece of fabric or from multiple pieces of fabric sewn together. Cut binding strips that are approximately 2-2.5 inches wide. The length of the binding strips will depend on the perimeter of the table runner.
Fold the binding strips in half lengthwise, with the wrong sides together, and press. This creates a crease in the center of the binding strip. Sew the binding to the front of the table runner, aligning the raw edge of the binding with the raw edge of the table runner. Use a ¼ inch seam allowance.
Miter the corners of the binding to create a clean and professional finish. To miter the corners, stop sewing ¼ inch from the corner of the table runner. Remove the table runner from the sewing machine. Fold the binding strip at a 45-degree angle, creating a diagonal fold. Then, fold the binding strip back on itself, aligning the raw edge of the binding with the raw edge of the table runner. Continue sewing along the next side of the table runner, starting at the corner.
After sewing the binding to the front of the table runner, fold the binding to the back of the table runner, encasing the raw edges. Pin the binding in place. Hand-stitch or machine-stitch the binding to the back of the table runner. If hand-stitching, use a blind stitch to create an invisible seam. If machine-stitching, use a straight stitch or a decorative stitch.
Once the binding is complete, press the table runner with an iron. This will help to set the stitches and create a smooth and professional finish. Trim any loose threads.
Tips For Success
Choosing the right fabric is crucial for the overall look and feel of the table runner. Consider the color scheme, pattern, and texture of the surrounding décor when selecting the fabric.
Accurate cutting is essential for ensuring that the finished table runner is square and that the design aligns correctly. Use a rotary cutter, cutting mat, and ruler for precise cuts. Take the time to accurately measure when selecting the dimensions of the table runner, so the length extends 6-12 inches beyond each end of the table.
Pressing the seams and binding is important for creating a flat and professional finish. Use an iron to press the seams open or to one side, depending on the design. Press the binding after it has been sewn to the front and back of the table runner.
Creating a quilted table runner is a rewarding project that allows for personal expression and creativity. By following these instructions and tips, individuals can create a beautiful and functional addition to their home décor. The project offers a chance to hone sewing skills, experiment with different fabrics and designs, and ultimately produce a unique and personalized piece.

How To Make A Quick And Easy Table Runner With Strips Quilting

Nordic Star Table Runner Free Pattern The Crafty Quilter

How To Make A Table Runner An Easy Step By Guide Quilting Life

Simple Pinwheel Quilt Table Runner Tutorial Freemotion By The River

Simple Table Runner Pattern Tutorial A Quilting Life

Fall Charm Quilted Table Runner Joyous Home

How To Make A Simple Table Runner The Stitching Scientist Pattern

Modern Quilted Table Runner

Beginners Table Runner Very Detailed Instructions

25 Free Table Runner Patterns To Lift Your Mood O Sewing
Related Posts