How to Make an Easy Reversible Table Runner
A table runner can significantly enhance the aesthetic appeal of a dining table or any surface used for display. Its versatility allows for seasonal decorations, themed events, or simply adding a touch of color and texture to a room. A reversible table runner offers even greater flexibility, allowing for two distinct looks with a single project. This article provides detailed instructions on how to create a simple yet elegant reversible table runner, suitable for both beginners and experienced crafters.
This project focuses on simplicity and efficiency, minimizing the need for complex sewing techniques or specialized equipment. The primary materials required are two complementary fabric choices, thread, a sewing machine, and basic measuring and cutting tools. The following steps outline the process of creating a reversible table runner that is both functional and visually appealing.
Selecting Fabrics and Preparing Materials
The first step involves choosing fabrics that complement each other. Contrast is often desirable, but coordinating colors and patterns can also produce a sophisticated effect. Consider the existing décor of the room where the table runner will be used. Fabric weight is also a factor; medium-weight cotton or linen blends are generally recommended for their durability and ease of handling. Avoid fabrics that are too thin or prone to fraying excessively.
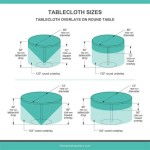
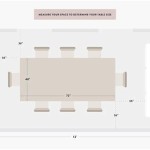
Once the fabrics have been selected, the next step is to determine the desired dimensions of the table runner. A standard width is typically between 12 and 16 inches, but this can be adjusted based on the size of the table. The length should extend beyond the ends of the table by several inches. A common guideline is to allow for an overhang of 6 to 12 inches on each end. Measure the table and add the desired overhang to calculate the total length required.
After determining the dimensions, prepare the fabric by washing and ironing it. This pre-shrinking process prevents the finished table runner from distorting after subsequent washing. Ironing ensures a smooth surface for accurate cutting. Using a rotary cutter, cutting mat, and ruler, cut two pieces of fabric to the determined dimensions. Ensure the fabric is aligned squarely to prevent skewed edges.
Gather all necessary materials: the two fabric pieces, thread that matches or complements the fabrics, sewing machine, scissors, pins, measuring tape or ruler, iron, and ironing board. A seam ripper is also useful for correcting any mistakes that may occur during the sewing process.
Constructing the Table Runner
With the fabric cut and prepared, the next stage involves assembling the table runner. Place the two fabric pieces right sides together, aligning the edges carefully. Pin the edges together, placing pins approximately every 2-3 inches. This prevents the fabric from shifting during sewing, ensuring a straight and even seam.
Using a sewing machine, stitch around the perimeter of the fabric, leaving an opening of approximately 6-8 inches on one of the shorter sides. This opening will be used to turn the table runner right side out. A standard straight stitch is suitable for this step. A seam allowance of ½ inch is generally recommended, but consistency is more important than the specific measurement. Be sure to backstitch at the beginning and end of the seam to secure the stitches and prevent unraveling.
After stitching around the perimeter, trim the corners of the fabric diagonally, being careful not to cut into the seams. This reduces bulk in the corners, allowing for a sharper and cleaner finish when the table runner is turned right side out. Turn the table runner right side out through the opening that was left unstitched. Use a point turner or blunt chopstick to gently push out the corners, ensuring they are fully formed and crisp.
Once the table runner is turned right side out, press it with an iron to flatten the seams and smooth out any wrinkles. Pay particular attention to the edges and corners. Fold in the raw edges of the opening that was left unstitched, and press them with the iron. This creates a clean and finished edge for the final step of closing the opening.
Finishing the Reversible Table Runner
The final step involves closing the opening and securing the edges of the table runner. There are several methods that can be employed for this purpose. One option is to use a blind stitch, which is a hand-sewing technique that creates an almost invisible seam. This is a suitable technique for those who prefer a more refined and professional finish.
Alternatively, the opening can be closed using a machine stitch. Select a stitch that is close to the edge of the fabric, such as a topstitch or an edge stitch. This option is often quicker and easier, particularly for those who are less experienced with hand sewing. If using a machine stitch, ensure that the thread matches the fabric closely to minimize visibility.
After closing the opening, give the table runner a final press with the iron to ensure that all seams are flat and smooth. This final pressing step enhances the overall appearance of the finished product. At this point, the reversible table runner is complete and ready for use.
Optional embellishments can be added to further customize the table runner. Decorative stitching along the edges, fringe, or tassels can enhance its visual appeal. However, these additions are not necessary and depend on individual preferences and the desired aesthetic. The focus of this project is on creating a simple and elegant reversible table runner that is both functional and visually pleasing in its basic form.
Proper care of the table runner is essential to maintain its appearance and extend its lifespan. Machine washing is generally acceptable, but it is important to use a gentle cycle and cold water. Avoid using harsh detergents or bleach, as these can damage the fabric. Tumble drying on low heat is also recommended, but air drying is preferable to prevent shrinkage. Iron the table runner as needed to remove any wrinkles.
The reversible nature of this table runner allows for versatility in decorating. One side can be used for everyday use, while the other side can be reserved for special occasions or seasonal themes. The ability to switch between two different looks with a single item provides greater flexibility and value. This project is an excellent way to enhance the appearance of a dining table or any other surface while utilizing basic sewing skills and readily available materials.
This detailed guide provides a comprehensive overview of how to create an easy reversible table runner. By following these steps, individuals of varying skill levels can produce a functional and visually appealing addition to their home décor. The simplicity of the design and the ease of construction make this project an ideal choice for those seeking a quick and rewarding sewing endeavor.

How To Make A Reversible Table Runner For Beginners

How To Make A Reversible Table Runner For Beginners

How To Sew A Reversible Table Runner Tutorial

Easy Reversible Holiday Table Runner

Make A Reversible Table Runner With This Easy Tutorial

Make A Reversible Table Runner With This Easy Tutorial

Easy Reversible Table Runner Infarrantly Creative

How To Sew A Reversible Quilted Table Runner With Mitred Corners

How To Make A Reversible Table Runner For Beginners

How To Make A Table Runner Quick Reversible Applegreen Cottage
Related Posts