How to Build a Round Bar Table Out of Wood Pallets and Legs
Constructing a round bar table using reclaimed wood pallets and prefabricated legs offers an environmentally conscious and cost-effective way to enhance a living space, patio, or entertainment area. This project provides a unique blend of rustic charm and modern functionality, allowing for personalization in terms of stain, paint, and overall design. The following guide outlines the necessary materials, tools, and step-by-step instructions for building a durable and aesthetically pleasing round bar table.
Before embarking on this project, a thorough assessment of the workspace and the availability of materials is essential. Safety precautions, including wearing safety glasses and gloves, should be prioritized throughout the entire construction process. The selection of high-quality materials and proper execution of each step will ensure a long-lasting and visually appealing finished product.
Key Point 1: Pallet Selection and Preparation
The foundation of the round bar table lies in the selection and preparation of suitable wood pallets. Not all pallets are created equal, and careful consideration should be given to the type of wood, structural integrity, and potential contaminants. Pallets marked with “HT” indicate heat treatment, which is generally considered safe. Avoid pallets marked with “MB,” as they have been treated with methyl bromide, a hazardous fumigant. Opt for pallets that are in good condition, free from excessive rot, splintering, or insect infestations.
Once suitable pallets have been identified, the disassembly process can begin. A reciprocating saw equipped with a metal-cutting blade is recommended for safely cutting through nails and staples without damaging the wood. Alternatively, a hammer and pry bar can be used, although this method requires more time and effort and may increase the risk of splitting the wood. Carefully remove the pallet boards, keeping them as intact as possible. Discard any boards that are severely damaged or unsuitable for use.
Following disassembly, the pallet boards require thorough cleaning and preparation. Begin by using a stiff brush and soapy water to remove any dirt, debris, or loose particles. Pressure washing can be employed for a more aggressive cleaning, but it is important to allow the wood to dry completely before proceeding. Once the boards are clean and dry, sanding is crucial to achieve a smooth and uniform surface. Start with a coarse-grit sandpaper (e.g., 80-grit) to remove any rough edges or imperfections, followed by progressively finer grits (e.g., 120-grit, 220-grit) to achieve the desired level of smoothness. Power sanders can significantly expedite this process, but manual sanding is also effective.
After sanding, inspect the boards for any remaining imperfections, such as nail holes, knots, or cracks. These can be filled with wood filler, which should be allowed to dry completely before being sanded smooth. The goal is to create a consistent and even surface that is suitable for staining or painting.
Key Point 2: Constructing the Round Tabletop
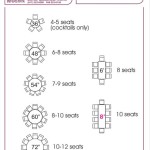
The construction of the round tabletop involves arranging and securing the prepared pallet boards to create a circular surface. The desired diameter of the tabletop will determine the number of boards required and the overall layout. It is advisable to plan the arrangement beforehand to minimize waste and ensure a visually appealing pattern.
One method for creating a round tabletop involves using a circular template. This can be made from a large sheet of plywood or cardboard, cut to the desired diameter of the table. The template is then placed on top of the arranged pallet boards, and the outline is traced using a pencil or marker. A jigsaw is then used to carefully cut along the traced line, creating the round shape. Ensure the boards are firmly clamped together during the cutting process to prevent movement and ensure a clean cut.
An alternative method involves cutting the pallet boards into smaller segments and arranging them in a radial pattern. This approach can create a more intricate and visually interesting tabletop. The segments can be cut using a miter saw or circular saw, ensuring accurate and consistent angles. The segments are then glued and clamped together, forming a circular shape. A backing board, typically made from plywood, can be attached to the underside of the tabletop to provide additional support and stability.
Once the round tabletop has been cut and assembled, the edges should be sanded smooth and rounded over to prevent sharp edges. This can be achieved using a router with a rounding-over bit or by hand-sanding with progressively finer grits of sandpaper. The edges can also be finished with edge banding for a more polished look.
The tabletop should be thoroughly inspected for any gaps or imperfections. These can be filled with wood filler or epoxy resin. Epoxy resin can be particularly useful for filling larger gaps and creating a durable and waterproof surface. Once the filler or resin has dried, sand it smooth to match the surrounding wood.
Key Point 3: Attaching the Legs and Finishing the Table
The final stage of the project involves attaching the prefabricated legs to the tabletop and applying a protective finish. The selection of legs will depend on the desired height and style of the bar table. Metal legs, such as hairpin legs or industrial-style legs, are commonly used for their durability and aesthetic appeal. Wooden legs can also be used, providing a more traditional or rustic look.
The legs should be attached to the underside of the tabletop using screws or bolts. Ensure the legs are evenly spaced and securely fastened to provide maximum stability. Pre-drilling pilot holes is recommended to prevent the wood from splitting. For added support, metal plates or corner brackets can be used to reinforce the connection between the legs and the tabletop.
Prior to applying the finish, the entire table should be thoroughly cleaned with a tack cloth to remove any dust or debris. The choice of finish will depend on the desired aesthetic and level of protection. Stain can be used to enhance the natural wood grain and add color. Paint can be used to create a more modern or vibrant look. A clear coat of polyurethane or varnish should be applied over the stain or paint to protect the wood from scratches, spills, and UV damage.
Apply the finish in thin, even coats, following the manufacturer's instructions. Allow each coat to dry completely before applying the next. Lightly sand between coats with fine-grit sandpaper to ensure a smooth and even finish. Multiple coats are typically required to achieve the desired level of protection and durability.
Once the finish has dried completely, inspect the table for any imperfections or blemishes. Touch up any areas as needed. The table is now ready for use. Regular cleaning and maintenance will help to prolong the life of the table and keep it looking its best.
Considerations in selecting legs include ensuring they are rated to support the intended weight of the table and its contents. The leg’s mounting hardware should be compatible with the pallet wood thickness and a secure attachment method should be employed. Prior to finishing the table, consider sealing any knots or imperfections in the pallet wood with a knot sealer to prevent sap from bleeding through the finish over time.
For added durability and weather resistance, especially for outdoor use, consider using marine-grade varnish or epoxy resin as a finish. These options provide excellent protection against moisture, UV rays, and extreme temperatures. Proper ventilation is crucial when working with these finishes due to their strong fumes. Also, inspect and tighten the leg attachments periodically to ensure the table remains stable and safe.
Customization options are plentiful. Embedding decorative elements like bottle caps, coins, or small tiles into the tabletop with epoxy resin can add a unique personal touch. Additionally, consider incorporating a built-in bottle opener or a small storage compartment beneath the tabletop for added functionality. The use of different pallet wood types or stains can create a varied and visually appealing surface.

Wood Pallet Table Diy A Beautiful Mess

Bar Height Pub Table 7 Steps With Pictures Instructables

How To Make Pallet Wood Into A Round Circle Shape Fox Hollow Cottage

Diy Pallet Table How To Make A Home On Cut Out Keep

Bar Height Pub Table 7 Steps With Pictures Instructables

Diy Round Table Shanty 2 Chic

Bar Stools With Pub Style Table Diy Woodworking

Diy Pallet Bar Instructions To Make Setting For Four Interiors

Bar Height Pub Table 7 Steps With Pictures Instructables

Pallet Wood Occasional Table
Related Posts