DIY Round Table Legs: A Comprehensive Guide
Creating a round table provides aesthetic appeal and functional versatility to any living space. While the tabletop often garners the most attention, the legs are equally crucial, contributing significantly to the table's stability, style, and overall design. Constructing round table legs independently enables customization, cost savings, and the satisfaction of a handcrafted piece of furniture. This guide outlines the process of designing and building round table legs, covering various styles, materials, and construction techniques.
Choosing the Right Style and Material
The selection of style and material lays the foundation for the entire project. The preferred aesthetic, the table's intended use, and the desired level of complexity all influence these decisions. Careful consideration at this stage ensures that the finished product aligns with the intended vision and meets practical requirements.
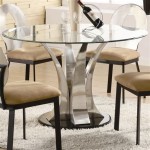
Several leg styles are suitable for round tables. Tapered legs offer a classic, elegant look, gradually narrowing from the top to the bottom. Straight legs provide a clean, modern aesthetic and are relatively straightforward to construct. Cabriole legs, characterized by an S-shaped curve, are more complex but add a touch of sophistication and traditional charm. Pedestal bases, consisting of a central column or a cluster of legs joined at the top and bottom, offer stability and a unique design element. Hairpin legs, made from metal rods bent into a hairpin shape, provide a minimalist, industrial aesthetic.
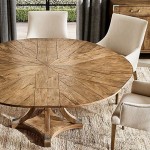
The choice of material affects both the appearance and the structural integrity of the table. Wood is a popular choice due to its versatility, beauty, and workability. Common wood options include pine, maple, oak, and walnut. Pine is cost-effective and easy to work with but may require staining or painting to achieve the desired finish. Maple is a hardwood known for its strength and smooth grain. Oak is durable and offers a distinctive grain pattern. Walnut is a premium wood prized for its rich color and elegant appearance.
Metal is another viable option, providing a modern, industrial aesthetic and exceptional strength. Steel and wrought iron are commonly used for metal legs. Steel can be welded and shaped relatively easily, allowing for various designs. Wrought iron offers a rustic, decorative look. When using metal, it's crucial to consider welding techniques, finishing processes (such as powder coating or painting), and the necessary safety precautions.
The material selection should also consider the table’s intended usage. For a heavy dining table, a sturdy hardwood like oak or maple is recommended. For a lightweight accent table, pine or a lighter metal may suffice. The overall design aesthetic of the room where the table will reside should also be taken into account to ensure a cohesive look.
Essential Tools and Equipment
Before embarking on the construction process, it is necessary to gather the appropriate tools and equipment. Having the right tools not only facilitates the process but also ensures precision, safety, and a professional-looking result. The specific tools required will vary depending on the chosen style, material, and construction techniques.
For woodworking projects, a miter saw is essential for making accurate angled cuts. A table saw is useful for ripping boards to the desired width. A drill or drill press is necessary for creating holes for screws or dowels. A sander, whether a belt sander, orbital sander, or sanding block, is used to smooth the surfaces and edges of the wood. A router can be employed to create decorative edges or grooves. Clamps are crucial for holding pieces together while glue dries. Measuring tools, such as a tape measure, ruler, and square, are essential for accurate measurements and layouts. Safety equipment, including safety glasses, hearing protection, and a dust mask, is paramount.
For metalworking projects, a welding machine is necessary for joining metal pieces. A metal cutting saw or angle grinder is used for cutting metal to size. A metal file or grinder is used to smooth rough edges. A drill with metal drill bits is necessary for creating holes in metal. Safety equipment, including a welding helmet, gloves, and apron, is critical for protecting against sparks, heat, and fumes.
Regardless of the material, a well-lit and ventilated workspace is essential for safety and efficiency. It's also prudent to have a workbench or stable surface for supporting the materials during cutting, drilling, and assembly.
Step-by-Step Construction Techniques
The construction process depends on the chosen style and material. However, some fundamental principles apply to most DIY round table leg projects. These include accurate measurements, precise cutting, secure joining methods, and careful finishing.
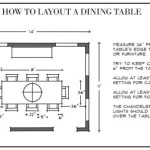
Begin by creating a detailed plan or sketch that outlines the dimensions, angles, and joinery methods for the legs. This plan serves as a guide throughout the construction process and helps prevent errors. Accurately measure and cut the materials according to the plan. Double-check all measurements before cutting to avoid costly mistakes. When cutting wood, use a miter saw to achieve precise angles, especially for tapered or angled legs. When cutting metal, use a metal cutting saw or angle grinder, ensuring a clean and straight cut.
Once the pieces are cut, the next step is to join them together. For wooden legs, several joinery methods are available. Screws are a simple and effective option, especially for straight legs. Use wood glue in conjunction with screws for added strength. Dowels provide a stronger and more aesthetically pleasing joint. Drill holes for the dowels in both pieces and insert the dowels with glue. Mortise and tenon joints are a traditional and robust option, requiring more skill and precision to create. A mortise is a hole cut into one piece of wood, and a tenon is a projection on the other piece that fits into the mortise.
For metal legs, welding is the primary method of joining pieces. Ensure that the metal is clean and properly aligned before welding. Use appropriate welding techniques for the type of metal being used. After welding, grind down any rough edges or excess weld material for a smooth finish.
After the legs are assembled, the finishing process begins. For wooden legs, sand the surfaces smooth, starting with a coarse grit sandpaper and gradually moving to finer grits. Apply a stain or paint to achieve the desired color and finish. Apply a sealant or varnish to protect the wood and enhance its durability. For metal legs, clean the surfaces and apply a primer to prevent rust. Apply a coat of paint or powder coating to achieve the desired color and finish.
Finally, attach the legs to the round tabletop. Position the legs evenly around the perimeter of the table. Use screws or bolts to secure the legs to the tabletop. Ensure that the legs are properly aligned and that the table is stable. Consider using metal plates or brackets to reinforce the connection between the legs and the tabletop, especially for heavy tables.
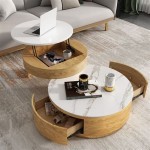
For pedestal bases, the construction process involves creating a central column or a cluster of legs that are joined at the top and bottom. The central column can be made from a single piece of wood or metal, or it can be constructed from multiple pieces joined together. The cluster of legs can be arranged in various patterns, such as a tripod or a four-legged base. Ensure that the base is wide enough to provide adequate stability for the tabletop.
Hairpin legs are typically purchased pre-made but can also be fabricated from metal rods. Attach the hairpin legs to the tabletop using screws or bolts. Ensure that the legs are evenly spaced and that the table is stable.
By following these steps and adapting them to the chosen style and material, individuals can create custom round table legs that enhance the aesthetic appeal and functionality of their furniture.

How To Make A Diy Round Table Base With Fluted Design Hometalk

Build A Round Side Table Basic

Diy Round Table Shanty 2 Chic

Round Dining Table How To Build An X Base

How To Build A 70 Round Dining Table Honey Built Home

How To Build A Dining Room Table Diy

How To Make A Diy Round Table Base With Fluted Design Hometalk

Round Dining Table Build With Only 300 In Tools And Materials

Diy End Table Angela Marie Made

More Like Home Round Coffee Tables 4 Easy To Build Styles Day 10
Related Posts