How Do You Make a Table Runner for Beginners?
A table runner is a decorative textile that runs lengthwise down the center of a dining table. It can add a touch of elegance to a formal dinner party or a pop of color to a casual gathering. Making your table runner is a fun and rewarding project, even for beginners. This article will guide you through the process, step by step, so you can create a beautiful and unique centerpiece for your table.
Choosing Your Materials
The first step in making a table runner is choosing the right materials. Here's a breakdown of what you'll need:
- Fabric: Consider the style and occasion for your table runner. For a formal setting, opt for silk, linen, or velvet. For a casual look, cotton, burlap, or even denim work well. Think about the weight and texture of the fabric, too. Lighter-weight fabrics tend to drape more while heavier fabrics provide a more structured look.
- Interfacing: Interfacing is a non-woven fabric that you can fuse to your fabric to give it more body and stability. This step is particularly useful for lighter-weight fabrics, as it helps the runner hold its shape and prevents it from wrinkling.
- Thread: Choose a thread that matches your fabric color. If you want a subtle look, opt for a thread that blends with the fabric. For a bolder statement, use a contrasting color thread.
- Measuring Tape: This is essential to ensure accurate cuts and a properly sized table runner.
- Scissors: Sharp scissors are crucial, especially for cutting fabric.
- Iron and Ironing Board: Pressing your fabric and interfacing is important for creating a crisp and professional finish.
- Sewing Machine: While you can hand-sew a table runner, a sewing machine will save you time and effort, especially for larger projects.
- Pins: Pins are used to hold the fabric pieces in place before sewing.
- Optional: If you're feeling creative, you can also add embellishments like buttons, beads, or ribbon to your table runner.
Cutting and Preparing the Fabric
Once you have your materials, it's time to cut your fabric and prepare it for sewing. Here's what you need to do:
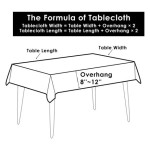
- Measure your table: Determine the desired length and width of your table runner. Remember to add seam allowances to the length and width. A standard seam allowance is 1/2 inch.
- Cut the fabric: Using your measuring tape and scissors, cut two fabric pieces for the top and bottom of the runner according to your calculated dimensions.
- Cut the interfacing: If you're using interfacing, cut two pieces that are slightly smaller than your fabric pieces. This will prevent the interfacing from showing at the edges of your runner.
- Fuse the interfacing: Using an iron set to the appropriate temperature for your fabric, fuse the interfacing to the wrong side of both fabric pieces. Follow the manufacturer's instructions for the interfacing you've chosen.
Sewing the Table Runner
Now that the fabric and interfacing are prepared, you're ready to sew your table runner. Here's how:
- Pin the fabric pieces together: Place the two fabric pieces right sides facing each other, making sure the edges line up perfectly. Pin the pieces in place along the edges.
- Sew the sides: Use a straight stitch to sew along the two long sides of the runner. Make sure to backstitch at the beginning and end of each seam to secure the stitches. Remove the pins as you sew.
- Press the seams: Once the sides are sewn, press the seams open. This will help to create a smooth and professional finish.
- Sew the ends: Repeat the same process for the ends of the runner. Pin the ends together, right sides facing, and sew along the edges.
- Press the finished seams: After sewing the ends, press them flat to give your table runner a clean look.
- Embellishments: If you want to add embellishments, do so now. For example, you can stitch buttons or beads along the edges of the runner, or add a decorative ribbon down the center.
Finishing Touches
After sewing your table runner, there are some finishing touches you can add to complete the project:
- Hemming the edges: Once the runner is sewn, fold the raw edges of the fabric under by 1/4 inch, and then fold them again by another 1/4 inch. Pin the folded edges in place, and sew them down with a straight stitch. This will create a clean and professional edge.
- Lining the runner: For a more formal look, you can line your table runner. To do this, simply cut a lining piece of fabric the same size as your runner. Place the lining on the wrong side of the runner, and sew the edges together using a straight stitch. This will create a crisp and elegant finish.
With a little time and effort, you can create a beautiful and unique table runner that will impress your guests. Remember to experiment with different fabrics, colors, and embellishments to create a runner that perfectly reflects your personal style.

How To Make A Reversible Table Runner For Beginners

Beginners Table Runner Very Detailed Instructions

How To Make A Table Runner Sew Much Ado

How To Make A Table Runner Sew Much Ado

How To Sew A Table Runner Heather Handmade

How To Make An Easy Table Runner

How To Make A Farmhouse Table Runner Well Purposed Woman

One Hour Version Of The 10 Minute Table Runner Super Mom No Cape

How To Make A Table Runner Beginner Sewing Tutorial Create Whimsy

How To Make A Table Runner Sew Much Ado
Related Posts


