How To Build A Simple Dining Table
Constructing a dining table is a manageable project for individuals with intermediate woodworking skills and access to basic tools. The process involves careful planning, accurate measurements, precise cutting, and secure assembly. This article provides a detailed guide on how to build a simple, durable dining table, focusing on functionality and ease of construction.
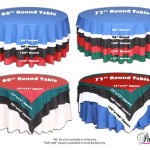
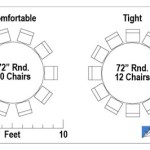
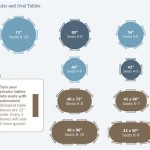
Before embarking on the project, it is crucial to determine the desired dimensions of the table. Consider the number of people the table needs to accommodate and the available space in the dining area. A standard dining table height ranges from 29 to 31 inches. The length and width will vary depending on individual needs. For example, a table designed to seat four people comfortably typically measures around 48 inches in length and 36 inches in width. Add at least 12 inches to the length and width for a table seating six.
Once the dimensions are established, a detailed materials list can be compiled. The primary components of the table include the tabletop, legs, and a support structure known as an apron. Hardwoods such as maple, oak, or walnut are excellent choices for their durability and aesthetic appeal. Softwoods like pine can be used, but they are more prone to dents and scratches. Plywood or MDF (Medium-Density Fiberboard) can be used as a tabletop base for painting or tiling. The apron is typically constructed from the same wood as the legs. All materials should be selected based on their dimensional stability, resistance to warping, and overall suitability for furniture construction.
The necessary tools for this project are a table saw or circular saw for cutting large pieces, a miter saw for accurate angle cuts, a drill with various drill bits, a sander for smoothing surfaces, clamps for securing joints during glue-up, and measuring tools such as a tape measure, square, and level. Personal protective equipment (PPE) including safety glasses, ear protection, and a dust mask are essential for a safe working environment.
Key Point 1: Cutting and Preparing the Tabletop
The tabletop forms the centerpiece of the dining table. The construction method will influence the final appearance. A solid wood tabletop can be created by joining multiple boards edge-to-edge, while a plywood or MDF tabletop offers a smooth surface for painting or tiling. When using solid wood, select boards of similar grain pattern and color for a cohesive look. Ensure that the boards are kiln-dried to minimize warping or cracking after assembly. The boards need to be cut slightly oversized, allowing for trimming after glue-up.
The joining process for solid wood tabletops typically involves using wood glue and clamps. Apply glue liberally to the edges of the boards, ensuring even coverage. Align the boards carefully, and clamp them together tightly. Wipe away any excess glue with a damp cloth. Allow the glue to dry completely according to the manufacturer's instructions, usually at least 24 hours. After the glue has dried, remove the clamps and use a hand plane or sander to flatten and smooth the surface. Start with coarse-grit sandpaper (80-grit) and gradually progress to finer grits (120-grit, 180-grit, 220-grit) to achieve a smooth, even finish. Exercise caution, as excessive sanding with coarse grit can remove too much material and affect the overall dimensions.
If constructing a plywood or MDF tabletop, cut the material to the desired dimensions using a circular saw or table saw. Ensure the cut is straight and square. Sand the edges smooth to remove any splinters. For a more decorative edge, consider routing the edges with a router and a decorative bit. This will add visual interest and soften the sharp corners.
Key Point 2: Building the Apron and Attaching the Legs
The apron provides structural support to the tabletop and serves as the attachment point for the legs. It is typically constructed from four pieces of wood, one for each side of the table. The dimensions of the apron pieces will depend on the size of the tabletop and the desired overhang. A common apron width is 3 to 4 inches.
Cut the apron pieces to the appropriate length using a miter saw. The corners of the apron can be joined using various methods, including mortise and tenon joints, dowel joints, or pocket hole screws. Mortise and tenon joints offer exceptional strength but require more advanced woodworking skills. Dowel joints are simpler to create and provide adequate strength for most applications. Pocket hole screws are the easiest and fastest method, but they may be visible unless carefully concealed.
Regardless of the joining method, ensure that the corners are square and the joints are secure. Apply wood glue to the joints and clamp the apron pieces together until the glue has dried. For pocket hole screws, use a pocket hole jig to drill the holes and then drive the screws in. Reinforce the joints with corner blocks for added stability. These blocks are small pieces of wood that are glued and screwed into the inside corners of the apron.
The legs can be purchased pre-made or crafted from solid wood. The legs should be of the appropriate length to achieve the desired table height. Attach the legs to the apron using screws or bolts. Predrill pilot holes to prevent the wood from splitting. For added strength, consider using metal leg plates, which are attached to the apron and provide a secure mounting point for the legs.
Ensure that the legs are attached squarely and that the table is stable. Use a level to check for any wobbling. If the table is uneven, shim the legs as needed to achieve a level surface.
Key Point 3: Finishing the Table
The finishing process protects the wood and enhances its aesthetic appeal. The choice of finish depends on the type of wood, the desired look, and the level of durability required. Common finishes include varnish, lacquer, polyurethane, and oil-based finishes.
Before applying any finish, sand the entire table thoroughly to remove any imperfections and create a smooth surface. Start with fine-grit sandpaper (220-grit) and work your way up to even finer grits (320-grit or 400-grit) for a glass-like finish. Remove all sanding dust with a tack cloth or vacuum cleaner.
Apply the finish according to the manufacturer's instructions. For varnish, lacquer, and polyurethane, multiple coats are typically required, with light sanding between each coat. Oil-based finishes are usually applied in thin coats and allowed to penetrate the wood. Wipe away any excess oil after a specified period. Allow the finish to dry completely before using the table.
Consider applying a sealant or primer before the finish, especially for softwoods. This will help to prevent the finish from soaking into the wood unevenly. For tabletops that will be exposed to water or spills, a water-resistant finish is recommended.
Once the finish has dried, inspect the table for any imperfections. Touch up any areas as needed. Apply a final coat of wax or polish to protect the finish and enhance its luster.
The completed dining table should be sturdy, level, and aesthetically pleasing. The construction process involves careful planning, precise execution, and attention to detail. While this guide provides a framework for building a simple dining table, variations and customizations are possible to suit individual needs and preferences. With patience and dedication, creating a beautiful and functional dining table is achievable.

25 Diy Dining Tables Bob Vila

Diy Rustic Modern Dining Table Shanty 2 Chic

20 Gorgeous Diy Dining Table Ideas And Plans The House Of Wood

Beginner Farm Table 2 Tools 50 Lumber Ana White

25 Diy Dining Tables Bob Vila

Super Simple Modern Dining Room Table

How To Build A Rustic Industrial Dining Table Wood Create

25 Diy Dining Tables Bob Vila

Diy Modern Dining Table Woodworking Plans

How To Build A Rustic And Bold Farm Table Diy Projects With Pete
Related Posts