How To Make A Dining Table Out Of Scaffold Boards DIY
Creating a dining table from scaffold boards is a popular DIY project, offering a rustic aesthetic and cost-effective solution for furnishing a home. This project allows for custom dimensions and a unique design that reflects individual preferences. This article provides a comprehensive guide on constructing a dining table using scaffold boards, outlining the required materials, tools, and step-by-step instructions.
Planning and Preparation: Setting the Foundation for Success
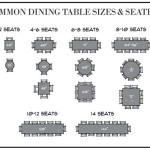
Before commencing any physical work, careful planning is crucial. This phase involves determining the table's dimensions, selecting appropriate scaffold boards, and compiling the necessary tools. The dimensions of the table should be based on the available space and the number of people it needs to accommodate. Consider standard dining table height, which typically ranges from 29 to 31 inches.
Scaffold boards are readily available from builders' merchants or online suppliers. When selecting boards, examine them for excessive warping, large knots, or significant damage. While some imperfections can add character, boards with severe defects should be avoided. It is generally recommended to source boards that are longer than the intended table length, allowing for end trimming to ensure clean, square edges. Consider the thickness of the boards when determining the overall table design; standard scaffold boards are usually around 38mm thick.
A comprehensive list of tools is essential before starting the project. This list should include a measuring tape, pencil, safety glasses, work gloves, a circular saw or hand saw (depending on preference), a sander (orbital or belt sander), sandpaper (various grits), a drill with drill bits, wood screws, wood glue, clamps, a level, and a sealant or finish of choice (e.g., varnish, wax, oil).
Ensuring a safe workspace is paramount. Clear the area of any obstructions and use appropriate safety equipment, such as safety glasses and gloves, throughout the project. Proper ventilation is necessary, especially when applying sealants or finishes.
Constructing the Tabletop: Assembling and Preparing the Scaffold Boards
The tabletop is the most prominent feature of the dining table, and its construction requires precision and attention to detail. Once the scaffold boards have been selected and the dimensions determined, the boards need to be cut to the desired length. Using a circular saw or hand saw, carefully cut the boards, ensuring straight and square cuts. If using a circular saw, a guide can be used to ensure accuracy.
After cutting, the boards need to be joined together to form the tabletop. There are several methods for joining the boards, including using wood screws, wood glue, or a combination of both. One effective approach is to apply wood glue along the edges of the boards and then clamp them together. Clamps should be evenly distributed along the length of the boards to ensure uniform pressure and a tight bond. Allow the glue to dry completely according to the manufacturer's instructions, which typically takes at least 24 hours.
Once the glue has dried, remove the clamps and use wood screws to further secure the boards. Pre-drilling pilot holes before inserting the screws is crucial to prevent the wood from splitting. Space the screws evenly along the length of the boards, ensuring they are countersunk to avoid protruding from the surface.
With the boards joined, the next step is to sand the tabletop to create a smooth and even surface. Start with a coarse grit sandpaper (e.g., 80 grit) to remove any imperfections, such as splinters or unevenness. Gradually progress to finer grits (e.g., 120 grit, 180 grit, 220 grit) to achieve a smooth finish. Sanding should be done in the direction of the wood grain to avoid scratching the surface. A power sander, such as an orbital or belt sander, can significantly expedite this process.
After sanding, thoroughly clean the tabletop to remove any sawdust. A vacuum cleaner or damp cloth can be used for this purpose. Ensure the surface is completely dry before proceeding to the finishing stage.
Creating the Table Base: Designing and Attaching the Support Structure
The table base provides the necessary support and stability for the tabletop. The design of the base can vary depending on individual preferences and the desired aesthetic. Common options include metal legs, wooden legs, or a trestle-style base.
If using metal legs, they can be purchased from furniture suppliers or online retailers. Ensure the legs are appropriately sized for the table and can support the weight of the tabletop. Metal legs typically come with pre-drilled holes for easy attachment. Position the legs at the corners of the tabletop and secure them using wood screws.
For wooden legs, consider using dimensional lumber, such as 4x4 posts or 2x4 boards. Design the legs to complement the tabletop and provide adequate support. The legs can be attached to the tabletop using wood screws, wood glue, or metal brackets. If using screws, pre-drilling pilot holes is essential. A support apron, constructed from 2x4 boards, can be added between the legs to provide additional stability. The apron should be attached flush with the underside of the tabletop, using screws and glue.
A trestle-style base offers a more rustic and traditional look. This type of base typically consists of two A-frame supports connected by a stretcher. The A-frames can be constructed from dimensional lumber, such as 2x4 boards, cut at an angle to form the desired shape. The stretcher, which runs lengthwise between the A-frames, provides additional stability. The tabletop can be attached to the trestle base using screws or bolts.
Regardless of the base design, ensuring the table is level is crucial. Use a level to check the tabletop and adjust the legs as necessary. Shims can be used to level the table on uneven surfaces.
Finishing and Sealing: Protecting and Enhancing the Table
The final step in constructing the dining table is to apply a sealant or finish to protect the wood and enhance its appearance. There are various options available, each with its own advantages and disadvantages. Common choices include varnish, wax, and oil.
Varnish provides a durable and water-resistant finish, making it suitable for dining tables that are exposed to spills and moisture. Varnish is available in various sheens, from matte to high-gloss. Apply varnish in thin, even coats, following the manufacturer's instructions. Multiple coats may be necessary to achieve the desired level of protection. Allow each coat to dry completely before applying the next.
Wax provides a natural and subtle finish, enhancing the wood's grain and texture. Wax is easy to apply and can be buffed to a sheen. However, wax is less durable than varnish and may require more frequent reapplication. Apply wax with a cloth or brush, working it into the wood grain. Allow the wax to dry for a few minutes, then buff it with a clean cloth to achieve a smooth finish.
Oil, such as tung oil or linseed oil, penetrates the wood and provides a natural, protective finish. Oil enhances the wood's grain and provides a warm, rich tone. Oil is relatively easy to apply but may require multiple coats to achieve the desired level of protection. Apply oil with a cloth or brush, allowing it to soak into the wood for a few minutes. Wipe off any excess oil with a clean cloth. Allow the oil to dry completely before applying the next coat.
Before applying any finish, it is recommended to test it on a small, inconspicuous area of the tabletop to ensure it achieves the desired look and does not react negatively with the wood. Follow the manufacturer's instructions carefully and allow the finish to dry completely before using the table.
Once the finish has dried, inspect the table for any imperfections or flaws. Touch up any areas as needed. The completed dining table can now be used and enjoyed.

Makeover A Dining Table Made From Scaffold Boards Roses And Rolltops

How To Make An Industrial Rustic Scaffold Board Dining Table And Bench

Diy Scaffold Board Dining Table And Bench

How To Make A Table Out Of Scaffold Boards Upcycling Safe
.jpg.aspx?strip=all "How To Make A Table Out Of Scaffold Boards Upcycling Safe")
How To Make A Table Out Of Scaffold Boards Upcycling Safe

Diy Scaffold Board Dining Table And Bench

How To Make An Industrial Rustic Scaffold Board Dining Table And Bench

How To Make A 4 6 Seater Dining Table From Reclaimed Scaffold Boards Friday Ad Blog

How To Build A Scaffold Board Table Prevent Cupping

Thrifty Diy How To Upcycle Scaffolding Boards Into A Garden Table My Life By Cassie Fairy Inspiration For Living Lovely On Budget
Related Posts