How To Make A Quick And Easy Table Runner For Beginners
Creating a table runner is a simple and rewarding sewing project, ideal for beginners seeking to personalize their home decor. This project requires minimal materials and basic sewing skills, allowing for rapid completion and immediate gratification. The following guide provides a step-by-step instruction on constructing a basic table runner suitable for various table sizes and aesthetic preferences.
Selecting Materials and Determining Size
The first crucial step involves selecting the appropriate fabric and determining the desired dimensions of the table runner. Fabric choice significantly impacts the table runner's appearance and durability. Consider the existing decor of the room and the intended use of the table runner when making a selection. Cotton is a popular choice due to its versatility, affordability, and ease of handling. Linen offers a more sophisticated and textured look, while heavier fabrics like denim or upholstery fabric are suitable for high-traffic areas or tables requiring more protection.
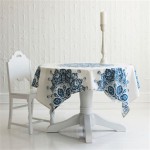
Beyond fabric type, consider the fabric's pattern and color. Solid colors offer a clean and contemporary aesthetic, while patterned fabrics can add visual interest and personality. Ensure the chosen fabric complements the existing tableware and decor without clashing or overwhelming the space. Small-scale patterns generally work better than large, bold designs for a table runner.
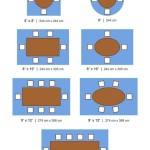
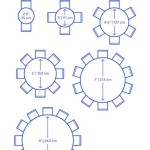
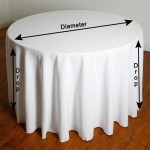
Determining the size of the table runner is equally important. A common guideline is to have the table runner hang down approximately 6-12 inches on each end of the table. Measure the length of the table and add twice the desired overhang to calculate the required length of the table runner. For the width, consider the table's width and the desired proportion. A standard table runner width ranges from 12 to 18 inches. For instance, if a table is 60 inches long and the desired overhang is 10 inches on each end, the required length of the table runner would be 80 inches (60 + 10 + 10). A width of 14 inches would be a suitable proportion for this table.
Once the dimensions are determined, gather the necessary materials. These include the selected fabric, a measuring tape or ruler, fabric scissors, pins, an iron, a sewing machine, matching thread, and a cutting mat (optional but recommended for precise cutting).
Cutting and Preparing the Fabric
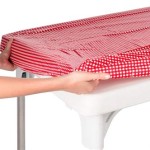
Accurate cutting is paramount for a professional-looking table runner. Begin by pre-washing and ironing the chosen fabric. This step prevents shrinkage after the table runner is completed and ensures a smooth surface for cutting and sewing. Ironing also helps to remove any creases or wrinkles that might distort the fabric's shape.
Lay the fabric flat on a clean, hard surface. Use a measuring tape or ruler and a fabric marker or tailor's chalk to mark the desired dimensions of the table runner. A cutting mat provides a stable surface and gridlines for precise measuring and cutting. Ensure the markings are clear and accurate before proceeding with cutting.
Using fabric scissors, carefully cut along the marked lines. Strive for straight, even cuts to avoid any uneven edges on the finished table runner. If using a rotary cutter and cutting mat, use a ruler as a guide for straight cuts. Once the fabric is cut to the correct size, it is prepared for the next stage of the construction process.
Consider adding interfacing to the fabric at this stage if a more structured table runner is desired. Interfacing is a fusible or sew-in material that adds stiffness and body to the fabric. It is particularly useful for lightweight fabrics or when creating decorative embellishments. If using fusible interfacing, follow the manufacturer's instructions to apply it to the wrong side of the fabric before proceeding with the next steps.
Sewing the Hem
Creating a neat and durable hem is essential for finishing the table runner. A double-fold hem is a common and effective technique for achieving a clean edge and preventing fraying. This involves folding the raw edge of the fabric twice towards the wrong side and then stitching it in place.
Begin by folding the raw edge of the fabric inward by approximately 1/4 inch and pressing it with an iron. This creates a clean, crisp fold that will serve as the first layer of the hem. Next, fold the edge inward again by approximately 1/2 inch, encasing the raw edge within the fold. Press it again with an iron to secure the fold.
Pin the folded hem in place along all four edges of the table runner. Use pins spaced every few inches to ensure the hem remains securely folded during sewing. The pins should be placed perpendicular to the edge of the fabric to prevent them from getting in the way of the sewing machine needle.
Thread the sewing machine with matching thread and adjust the stitch length to a medium setting (approximately 2.5-3 mm). Begin sewing along the inside edge of the folded hem, close to the folded edge. Maintain a consistent seam allowance throughout the entire hem. Backstitch at the beginning and end of each seam to secure the stitches and prevent unraveling.
As the hem is being sewn, remove the pins carefully, ensuring the fabric remains securely folded. Take the time to maneuver the fabric around corners, creating neat and mitered corners if desired. Mitered corners involve folding and stitching the corners at a 45-degree angle to create a clean, professional finish.
Once the hem is completely sewn, remove any remaining pins and trim any excess threads. Give the finished table runner a final press with an iron to set the seams and create a polished appearance. At this point, the basic table runner is complete, and additional embellishments can be added if desired.
Adding Embellishments (Optional)
To further personalize the table runner, consider adding embellishments such as decorative trims, appliques, or embroidery. These additions can enhance the table runner's aesthetic appeal and reflect individual style.
Decorative trims, such as ribbons, lace, or pom-pom trim, can be sewn along the edges of the table runner to add texture and visual interest. Choose trims that complement the fabric and overall design. Carefully pin the trim in place and sew it securely using a sewing machine or by hand with a needle and thread.
Appliques, which are decorative patches of fabric, can be attached to the table runner to create focal points or add thematic elements. Appliques can be purchased pre-made or created from fabric scraps. Fuse them to the runner’s fabric with fusible web or sew them securely using a satin stitch around the edges.
Embroidery can add a personalized touch to the table runner. Simple embroidery stitches, such as running stitch, back stitch, or French knots, can be used to create patterns, monograms, or decorative motifs. Transfer the design onto the fabric using a transfer pen or embroidery pattern, and then stitch along the lines using embroidery floss and a needle.
Before adding any embellishments, consider the overall design of the table runner and ensure the embellishments complement the fabric and existing decor. It is advisable to practice on a fabric scrap before applying embellishments to the finished table runner to ensure the desired effect is achieved.
With careful planning and execution, a simple table runner can be transformed into a unique and personalized piece of home decor. The process of creating a table runner not only provides a practical skill but also encourages creativity and self-expression.

How To Make A Quick And Easy Table Runner With Strips Quilting

How To Make An Easy Table Runner For Your Dining Room Our Little Handmade Home

Fast And Easy Table Runner Tutorial Freemotion By The River

Spring Bunny Table Runner Tutorial The Crafty Quilter

How To Make A Table Runner In 10 Minutes Quick And Easy Minute

How To Make An Easy Table Runner For Your Dining Room Our Little Handmade Home

How To Make A Simple Table Runner The Stitching Scientist Pattern

Simple Table Runner Diy The Sewing Loft

Spirit Of Table Runner Samelia S Mum

Scrap Buster Make Easy Table Runner Using The Binding Tool
Related Posts