How to Make a Round Pedestal Table Base
A round pedestal table base is a versatile piece of furniture that can add elegance and style to any room. Whether you're creating a dining table, a coffee table, or a side table, a pedestal base offers a unique and charming aesthetic. Building a round pedestal table base is a rewarding DIY project that allows you to customize the design to match your personal style. This article will guide you through the process of creating a sturdy and beautiful round pedestal table base.
Gathering Materials and Tools
Before embarking on your project, ensure you have all the necessary materials and tools readily available. The specific materials will vary based on the size and design of your pedestal table base, but here's a general list:
- Wood: Choose a sturdy hardwood like oak, maple, or walnut. The thickness of the wood will determine the strength and stability of the base.
- Glue: A strong wood glue is essential for joining the pieces of wood together.
- Screws: Use wood screws to secure the pieces together. Choose screws appropriate for the thickness of the wood.
- Sandpaper: Sandpaper of various grits is needed for achieving a smooth and polished finish.
- Finish: Select a finish that complements your desired aesthetic. Options include stain, paint, or varnish.
- Tabletop: Decide on the size and material for your tabletop, ensuring it matches the footprint of the pedestal base.
- Tools: You will need a circular saw, jigsaw, drill, sander, measuring tape, pencil, clamps, and safety gear.
Constructing the Pedestal
The pedestal is the central element of the table base, and its shape and design determine the overall aesthetics of your project. Here's how to create a classic round pedestal:
- Cut the Wood: Begin by cutting the wood to the desired dimensions for the pedestal. You will need a circular piece of wood for the bottom, a circular piece for the top, and a rectangular piece for the center. The dimensions of these pieces will depend on the overall height and width of your desired pedestal base.
- Shape the Center Piece: If you're creating a fluted pedestal, shape the center piece to match the desired design. You can use a jigsaw to cut out the fluting pattern.
- Assemble the Pedestal: Using wood glue and screws, join the bottom piece, the center piece, and the top piece of the pedestal together. Ensure the pieces are aligned and evenly spaced. Use clamps to secure the joint while the glue dries.
- Sand the Pedestal: After the glue has dried, sand the pedestal with various grits of sandpaper to achieve a smooth and polished surface. Pay attention to any sharp edges or rough areas.
- Apply Finish: Once the pedestal is sanded, apply your chosen finish. This could involve staining, painting, or varnishing the pedestal to achieve the desired look.
Creating the Base
The base of the round pedestal table provides the foundation for the entire structure. It needs to be stable and strong enough to support the weight of the tabletop and the pedestal itself. Here's how to create a sturdy round base:
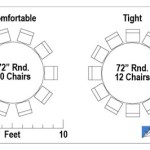
- Cut the Wood: Begin by cutting a circular piece of wood for the base. The diameter of this piece will be slightly larger than the top of your pedestal. Ideally, the base diameter should be about 1.5 to 2 times the diameter of the pedestal.
- Shape the Base: If you're creating a base with a decorative edge, use a jigsaw to cut the desired shape. Popular options include a simple rounded edge or a more elaborate design with curves or angles.
- Attach the Base to the Pedestal: Position the prepared base on top of the pedestal. Use wood glue and screws to secure the base to the pedestal, ensuring the alignment is even. Clamp the joint while the glue dries.
- Reinforce the Base: For added stability, you can consider reinforcing the base with additional supports or braces. These supports can be attached to the underside of the base and help distribute the weight more evenly.
- Sand and Finish: Once the base is secured and the glue is dry, sand the entire base smoothly. Apply your chosen finish to match or complement the finish of the pedestal.
Adding the Tabletop
The final step in creating your round pedestal table base is attaching the tabletop. Choose a tabletop material that complements your style and the base's design. Some popular options include wood, glass, or stone. Here's how to attach the tabletop:
- Measure and Cut: Ensure the tabletop's diameter aligns with the base's diameter. You may need to adjust the tabletop's size for a perfect fit.
- Attach the Tabletop: Position the tabletop on top of the pedestal base. For wood tabletops, you can use screws or bolts to attach the tabletop to the base. For glass or stone tabletops, consult with a professional installer to ensure proper attachment.

Round Scalloped Fluted Pedestal Dining Table Diy Seats 10 12 People Black Ink Oak Finish

Diy Round Table Kitchen Wood Pedestal Base

Diy X Base Circular Dining Table Jaime Costiglio

Round Scalloped Fluted Pedestal Dining Table Diy Seats 10 12 People Black Ink Oak Finish

Diy Round Table Wood Designs Dining Furniture

Diy Wood Pedestal Table Base The Inspired Work

Diy Simplistic Circular Dining Table Kreg Tool

Pedestal Table Base Build Round Part 1

Diy X Base Circular Dining Table Jaime Costiglio

Round Modern Dining Table Base Ana White
Related Posts