How To Make A Round Table Base
Creating a visually appealing and structurally sound round table base presents a fascinating woodworking challenge. A well-crafted base not only provides stability but also complements the tabletop, enhancing the overall aesthetic of the piece. This article details the process of constructing a round table base, covering design considerations, material selection, and step-by-step construction techniques.
The design of the base should consider the size, weight, and style of the tabletop. A small, lightweight tabletop might require a simpler base, while a large, heavy tabletop will need a more substantial and robust design. The style of the base should also align with the intended aesthetic; a modern tabletop could benefit from a minimalist metal base, while a rustic tabletop might pair well with a wooden trestle-style base.
Choosing the right materials involves considering both aesthetics and structural integrity. Wood is a common choice for table bases due to its versatility, workability, and inherent beauty. Hardwoods like maple, oak, and walnut offer excellent strength and durability, while softwoods like pine can be suitable for lighter-duty applications. Metal, particularly steel, provides exceptional strength and stability and is often used for modern or industrial-style bases. The choice of material will also impact the tools and techniques required for construction.
The construction process typically involves several stages, including planning, cutting, joinery, assembly, and finishing. Careful planning is crucial to ensure accurate dimensions and a structurally sound design. Precise cutting is essential for creating clean, tight joints. Strong joinery techniques are needed to ensure the base's stability and longevity. Proper assembly ensures that all components fit together correctly. Finally, a well-applied finish enhances the base's appearance and protects it from the elements.
Planning and Design Considerations
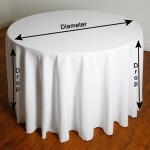
Before commencing any physical construction, a detailed plan is essential. This plan should include a thorough sketch or CAD drawing of the intended base, complete with all relevant dimensions and material specifications. Consideration must be given to the desired height of the table, the diameter of the tabletop, and the overall style of the base.
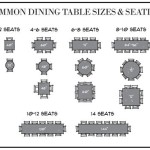
One critical aspect of planning is determining the footprint of the base. The base needs to be wide enough to provide adequate stability, preventing the table from tipping over, but not so wide that it interferes with legroom. A general rule of thumb is that the diameter of the base should be at least half the diameter of the tabletop. However, the specific design may require adjustments to this rule.
Several structural considerations must be addressed. The base should be designed to distribute the weight of the tabletop evenly and efficiently. The joinery should be strong enough to withstand the stresses of everyday use. The chosen materials should be capable of supporting the weight of the tabletop and any anticipated load. The overall design must provide sufficient rigidity to prevent wobble or instability.
Different design options offer varying aesthetic and structural advantages. A pedestal base, consisting of a single central support, offers a clean and uncluttered look. A trestle base, composed of two vertical supports connected by a horizontal stretcher, provides excellent stability and a traditional aesthetic. A four-leg base, with legs arranged in a square or rectangular pattern, offers a simple and sturdy design. The choice of design will depend on the specific requirements of the project and the desired aesthetic.
Cutting and Joinery Techniques
Once the design is finalized, the next step is cutting the materials to the required dimensions. Accuracy is paramount at this stage, as even small errors can accumulate and affect the overall fit and stability of the base. A miter saw is ideal for cutting angles precisely, while a table saw can be used for making straight cuts and ripping boards to width. A bandsaw can be useful for cutting curves or intricate shapes.
Various joinery techniques can be employed to connect the components of the base. Mortise and tenon joints are a strong and traditional choice, providing excellent resistance to both shear and tensile forces. Dowel joints offer a simpler alternative, using cylindrical wooden dowels to align and reinforce the joint. Biscuit joints utilize thin, oval-shaped biscuits to increase the gluing surface area and strengthen the joint. Pocket-hole joinery is a quick and easy method that uses angled screws to create a strong connection.
The selection of the appropriate joinery technique depends on the specific design, the materials being used, and the available tools and skills. For heavy-duty applications, mortise and tenon joints are generally preferred. For lighter-duty applications, dowel or biscuit joints may be sufficient. Pocket-hole joinery is a good option for beginners or for projects where speed and simplicity are important.
Clamping is essential during the gluing process to ensure a tight and strong bond. Various types of clamps are available, including bar clamps, pipe clamps, and spring clamps. The type of clamp used will depend on the size and shape of the components being joined. It is important to apply sufficient clamping pressure to squeeze out excess glue and ensure a tight fit. The glue should be allowed to dry completely before removing the clamps.
Assembly and Finishing
After the individual components have been cut and joined, the next step is to assemble the base. This involves carefully aligning all the pieces and securing them together with glue and fasteners. It is important to check for squareness and alignment throughout the assembly process to ensure that the base is straight and true. Any necessary adjustments should be made before the glue dries.
Once the glue has dried, the base can be sanded to remove any imperfections and create a smooth surface. Start with a coarse grit sandpaper, such as 80-grit, to remove any major blemishes. Then, gradually work your way up to finer grits, such as 120-grit, 180-grit, and finally 220-grit. Sanding should be done in the direction of the grain to avoid scratching the wood.
The final step is to apply a finish to protect the wood and enhance its appearance. Various types of finishes are available, including varnish, lacquer, polyurethane, and oil-based finishes. The choice of finish will depend on the desired look and the intended use of the table. Varnish and lacquer provide a durable and glossy finish, while polyurethane offers excellent resistance to water and abrasion. Oil-based finishes penetrate the wood and provide a natural, matte finish.
Before applying the finish, it is important to prepare the surface properly. This involves cleaning the wood with a tack cloth to remove any dust or debris. The finish should be applied in thin, even coats, allowing each coat to dry completely before applying the next. Multiple coats may be necessary to achieve the desired level of protection and appearance. Light sanding between coats can help to create a smoother finish.
For metal bases, welding is a common method of joining components. Welding requires specialized equipment and skill, but it provides a strong and durable connection. After welding, the metal can be ground down to create a smooth surface. Metal bases can be finished with paint, powder coating, or a clear coat to protect them from rust and corrosion.
Creating a round table base involves careful planning, precise cutting, strong joinery, and a well-applied finish. By following these steps, it is possible to create a beautiful and functional base that will provide years of enjoyment.

Diy Round Table Kitchen Wood Pedestal Base

Build A Simple Diy Pedestal Table Base Easy Steps With Abbotts At Home

Ideas On How To Make A Drum Cylinder Table Base Lumberjocks Woodworking Forum

Diy Round Outdoor Dining Table With Accents Jaime Costiglio

How To Build A Huge Round Table

Diy Wood Pedestal Table Base The Inspired Work

Diy X Base Circular Dining Table Jaime Costiglio

Mid Century Modern Pedestal Table Build Custom Round Dining How To Woodworking

Diy Round Table Shanty 2 Chic

How To Build A 70 Round Dining Table Honey Built Home
Related Posts