How To Make A Simple Quilted Table Runner
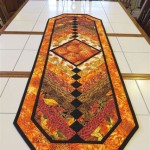
A quilted table runner is an excellent way to add a touch of homemade elegance to any dining space. It provides a decorative accent, protects the table surface, and can be customized to match any décor. This article provides a step-by-step guide on how to create a simple quilted table runner, suitable for beginners and experienced quilters alike. The process encompasses fabric selection, cutting, piecing, quilting, and binding, each crucial for achieving a professional and durable finished product.
The choice of fabric is a critical first step. It dictates the overall aesthetic of the table runner. Cotton fabrics are generally recommended for quilting due to their ease of handling, availability in a wide range of colors and patterns, and compatibility with various quilting techniques. Consider the color scheme and style of the surrounding room when selecting fabrics. Coordinating colors and patterns will create a cohesive look. It is advisable to pre-wash all fabrics before cutting to prevent shrinkage after the table runner is completed. Pre-washing also removes any sizing or finishes that may interfere with quilting or binding.
Prior to cutting the fabric, a design should be finalized. For a simple table runner, a straightforward rectangular shape is often preferred. Determine the desired finished dimensions of the table runner. A common size is 14 inches wide by 48 inches long, but this can be adjusted to suit the specific table being used. Once the dimensions are established, add seam allowances to all sides. A standard ¼-inch seam allowance is typical for quilting. Therefore, the fabric pieces for the front and back of the table runner should be cut to the finished size plus ½ inch on each side.
Fabric Cutting and Preparation for the Table Runner
Accurate fabric cutting is essential for achieving a well-proportioned and visually appealing table runner. Use a rotary cutter, a cutting mat, and a quilting ruler for precise cuts. These tools provide accuracy and efficiency compared to using scissors and traditional measuring tools. Begin by squaring up the fabric. This involves aligning the fabric grain and cutting along the grain edges to create a true rectangle. This ensures that the fabric lays flat and the finished table runner is free from distortion.
For the top layer, it is possible to use one continuous piece of fabric, or multiple fabric pieces can be sewn together to create a patchwork design. If opting for a patchwork design, carefully cut the individual fabric pieces according to the chosen pattern. Ensure that all pieces are cut consistently and accurately to avoid misalignments during the piecing process. Press each fabric piece with an iron before assembling the top layer. This helps to remove wrinkles and create crisp, flat seams when the pieces are sewn together.
The backing fabric should be cut to the same size as the top fabric layer. This creates a uniform base for the quilting process. The batting, which provides the loft and warmth to the table runner, should also be cut to the same size as the top and backing fabrics. Ensure that the batting is a high-quality quilting batting that is suitable for machine quilting. Various types of batting are available, including cotton, polyester, and blends. The choice of batting depends on the desired weight and drape of the finished table runner.
Constructing the Quilted Table Runner
Once the fabric pieces are cut and prepared, the next step is to assemble the quilt sandwich. This involves layering the backing fabric, the batting, and the top fabric layer. Ensure that all three layers are aligned properly and that there are no wrinkles or creases. The backing fabric should be placed face down on a flat surface. The batting is then placed on top of the backing fabric, followed by the top fabric layer, placed face up.
To secure the quilt sandwich, use safety pins or basting spray. Safety pins should be placed every few inches across the entire surface of the quilt sandwich. Ensure that the pins are inserted perpendicular to the fabric layers to prevent shifting during quilting. Basting spray is an alternative to pinning. It is a temporary adhesive that holds the layers together. Spray the batting with basting spray and then adhere it to the backing fabric and the top fabric layer. This method can be quicker than pinning and reduces the risk of accidentally sewing over pins.
Quilting is the process of stitching through all three layers of the quilt sandwich to create a cohesive and durable fabric. A variety of quilting techniques can be used, depending on the desired effect. Simple straight-line quilting is a popular choice for beginners. This involves stitching straight lines across the table runner, either parallel to the edges or diagonally. Free-motion quilting is a more advanced technique that allows for greater creativity and intricate designs. This involves disengaging the feed dogs on the sewing machine and moving the fabric freely under the needle.
When quilting, begin in the center of the table runner and work outwards. This helps to prevent puckering and distortion. Use a walking foot on the sewing machine to ensure that all three layers of fabric are fed evenly. A walking foot has a set of feed dogs that move along with the fabric, preventing the top layer from shifting. Adjust the stitch length on the sewing machine to achieve the desired quilting density. A shorter stitch length will create a denser quilt, while a longer stitch length will create a looser quilt.
Binding and Finishing the Table Runner
The final step in creating a quilted table runner is binding the edges. Binding is the process of encasing the raw edges of the quilt with fabric to create a clean and finished look. It also adds durability to the edges of the table runner, preventing fraying. The binding fabric should be cut into strips that are typically 2 ¼ inches wide. The length of the binding strips will depend on the perimeter of the table runner. Calculate the total length of binding needed by adding up the lengths of all four sides of the table runner.
To prepare the binding, fold the binding strips in half lengthwise, with the wrong sides together, and press. This creates a folded edge that will be used to encase the raw edges of the quilt. Next, sew the binding strips together end-to-end to create one continuous length of binding. Use a diagonal seam to join the strips, and trim the excess fabric. Press the seams open to reduce bulk.
Attach the binding to the table runner by aligning the raw edge of the binding with the raw edge of the quilt. Begin sewing the binding to the quilt, starting at one corner. Use a ¼-inch seam allowance. As you approach each corner, stop sewing ¼ inch from the edge. Fold the binding at a 45-degree angle and then fold it back along the next edge of the quilt. This creates a mitered corner. Continue sewing the binding to the quilt along the remaining edges.
Once the binding is sewn to the front of the quilt, turn the binding to the back of the quilt and hand-stitch it in place. Use a blind stitch to create an invisible seam. Ensure that the binding is pulled snugly around the edge of the quilt, but not so tightly that it distorts the fabric. Alternatively, the binding can be machine-stitched to the back of the quilt. Use a decorative stitch or a zigzag stitch to secure the binding. Once the binding is complete, trim any loose threads and press the table runner to create a crisp, finished edge.
Regular care and maintenance will prolong the life of the quilted table runner. It is recommended to machine wash the table runner on a gentle cycle with cold water. Use a mild detergent and avoid using bleach. Tumble dry on low heat or hang the table runner to dry. Iron the table runner as needed to remove wrinkles. Store the table runner in a cool, dry place when not in use. By following these care instructions, the quilted table runner will remain a beautiful and functional addition to the dining space for years to come.

How To Make A Simple Table Runner The Stitching Scientist Pattern Quilted Runners Patterns

How To Make A Quick And Easy Table Runner With Strips Quilting

Nordic Star Table Runner Free Pattern The Crafty Quilter

Simple Table Runners Learn How To Quilt Com

How To Make A Simple Quilted Table Runner

Simple Table Runners

Fall Table Runner Ideas And Tutorials Diary Of A Quilter

Quick And Easy Table Runner Pattern Quilting
Sew Today Clean Tomorrow Easy Table Runner

Nordic Star Table Runner Free Pattern The Crafty Quilter
Related Posts

