How To Make A Simple Tablecloth
Creating a simple tablecloth is a rewarding sewing project suitable for beginners and experienced sewists alike. A well-made tablecloth can transform a dining space, protect furniture, and add a personal touch to any occasion. This article outlines the process of making a simple, rectangular tablecloth, covering material selection, measurement, cutting, and basic sewing techniques.
The process begins with careful planning and material selection. This ensures the finished product meets the intended purpose and aesthetic preferences. Proper preparation will streamline the sewing process and contribute to a professional-looking final result.
Choosing the Right Fabric
The fabric chosen for a tablecloth significantly impacts its appearance, durability, and ease of care. Several factors should be considered when selecting the material. These include the table's intended use, desired aesthetic, and personal preferences regarding maintenance.
Cotton is a popular choice for tablecloths due to its versatility, affordability, and ease of sewing. It is available in a wide range of colors, patterns, and weights, making it suitable for various occasions. However, cotton is prone to wrinkling and may require ironing after washing. Pre-washing the fabric is crucial to prevent shrinkage after the tablecloth is completed.
Linen is another excellent option for tablecloths, offering a more luxurious and elegant look. It is known for its durability, absorbent properties, and natural texture. Linen wrinkles easily but gains character with each wash and use. Similar to cotton, pre-washing linen is important to prevent shrinkage. Linen is typically more expensive than cotton.
Polyester fabrics are a practical choice for tablecloths due to their wrinkle-resistance, stain-resistance, and durability. They are often less expensive than natural fibers and require minimal maintenance. Polyester fabrics are available in various colors and patterns, but they may not have the same natural feel as cotton or linen.
Blends of cotton and polyester combine the benefits of both fibers. These fabrics are more wrinkle-resistant than cotton but retain some of the natural feel. They are also generally more durable than pure cotton and require less ironing. A cotton-polyester blend can be a good compromise between aesthetics and practicality.
Outdoor tablecloths require fabrics specifically designed to withstand the elements. These fabrics are typically water-resistant, fade-resistant, and mildew-resistant. Common choices include acrylic canvas and outdoor polyester fabrics. It is important to select a fabric specifically labeled for outdoor use to ensure its durability and longevity.
The weight of the fabric also plays a role in the tablecloth's drape and appearance. Lighter-weight fabrics will have a softer drape, while heavier-weight fabrics will have a more substantial feel. Consider the desired aesthetic and the table's size when choosing the fabric weight.
Beyond these common choices, consider fabrics like damask, brocade, or even canvas for more specialized or durable applications. Always consider the cleanability. Some fabrics are dry clean only, requiring professional cleaning services.
Accurate Measuring and Cutting
Accurate measurement and cutting are essential for creating a tablecloth that fits the table properly and has a professional finish. Taking precise measurements and using the correct cutting techniques will ensure the tablecloth hangs evenly and looks aesthetically pleasing.
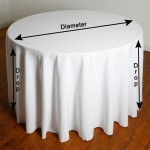
First, measure the length and width of the tabletop. Use a measuring tape and ensure it is held straight to obtain accurate measurements. If the table is round, measure the diameter. For an oval table, measure the length and width at the widest points.
Next, determine the desired drop, which is the length the tablecloth will hang over the edge of the table. A standard drop is typically between 8 and 12 inches, but this can be adjusted based on personal preference. For formal occasions, a longer drop may be desired, while a shorter drop may be more practical for everyday use. The drop must be consistent for all four sides.
Add twice the desired drop to both the length and width measurements of the tabletop. This will determine the total dimensions of the fabric needed. For example, if the table is 48 inches long and 36 inches wide, and a 10-inch drop is desired, the fabric should be cut to 68 inches long (48 + 10 + 10) and 56 inches wide (36 + 10 + 10).
Before cutting the fabric, pre-wash and dry it according to the manufacturer's instructions. This will prevent shrinkage after the tablecloth is sewn. Iron the fabric to remove any wrinkles, making it easier to measure and cut accurately.
Lay the fabric on a flat, clean surface. Use a rotary cutter, fabric scissors, or sharp scissors to cut the fabric to the calculated dimensions. A rotary cutter and cutting mat can provide the most accurate and efficient cutting, especially for large pieces of fabric. Use a ruler or measuring tape to ensure the edges are straight and even.
If using scissors, mark the cutting lines with fabric chalk or a disappearing ink pen. This will help ensure accurate cuts. Pin the fabric layers together to prevent them from shifting during cutting, especially when working with slippery fabrics.
Double-check all measurements before cutting to avoid mistakes. Cutting the fabric accurately is crucial for a professional-looking tablecloth.
Basic Sewing Techniques for a Clean Finish
The final step in creating a simple tablecloth is sewing the hem to provide a clean and durable finish. Proper hemming techniques will prevent fraying and give the tablecloth a professional appearance. There are several hemming options available, each offering a different look and level of durability.
A simple hem is the easiest and most common hemming technique for tablecloths. To create a simple hem, fold the edge of the fabric over by ¼ inch and press with an iron. Then, fold the edge over again by another ½ inch and press again. This creates a double-folded hem that encloses the raw edge of the fabric. Pin the hem in place and sew along the inner edge of the fold, using a straight stitch. Remove the pins as the fabric is sewn. This method is very straight forward and great for beginners.
A mitered corner provides a clean and professional finish to the corners of the tablecloth. To create a mitered corner, first create a simple hem as described above, but do not sew the corners shut. Unfold the hem at the corner and fold the corner diagonally, right sides together, bringing the folded edges of the hem together. Press the fold. Sew along the diagonal fold, creating a seam that miter's the corner. Trim the excess fabric and turn the corner right side out. The mitered corner should now be neat and pointed. Pin the mitered corner in place and sew along the inner edge of the hem, securing the corner.
A serged edge provides a clean and durable finish for fabrics that are prone to fraying. A serger is a specialized sewing machine that overlocks the edge of the fabric, preventing it from unraveling. If a serger is available, serge all four edges of the tablecloth before hemming. This will create a clean edge and make hemming easier. After serging, create a simple hem as described above, folding the serged edge over and sewing it in place.
A blind hem is a technique that creates an almost invisible hem on the right side of the fabric. This is a more advanced hemming technique that requires a blind hem foot on the sewing machine. Fold the edge of the fabric over by ¼ inch and press with an iron. Then, fold the hem back on itself, leaving a small portion of the folded edge exposed. Sew along the folded edge, using the blind hem stitch on the sewing machine. The blind hem stitch will catch a few threads of the fabric on the right side, creating an almost invisible hem.
When sewing the hem, use a thread that matches the fabric color. This will make the stitches less visible. Adjust the stitch length on the sewing machine to create a neat and even seam. A shorter stitch length is generally preferred for hemming.
Press the finished hem with an iron to create a crisp and professional finish. This will help the hem lay flat and prevent it from rolling. Inspect the finished tablecloth for any loose threads or uneven seams and trim them as needed.
Consider adding embellishments to the tablecloth, such as decorative stitching, lace trim, or embroidery, to personalize it and add a unique touch. These embellishments can be added before or after hemming, depending on the desired effect. A simple decorative stitch along the hem can add visual interest to the tablecloth.
By following these steps, creating a simple and well-finished tablecloth is attainable. Choosing the right fabric, precise measurements, and attention to hemming techniques will result in a durable and attractive addition to any dining setting.

How To Make A Tablecloth

How To Diy A Simple Drop Cloth Table Runner Vintage Inspired Easy Sewing Project Budget Friendly

Table Cover Making How To Make A Simple Dining Full Tutorial For Beginners

Easy Fall Outdoor Table With Drop Cloth Hallstrom Home

Painting Fabric To Make A Modern Table Runner Sustain My Craft Habit

Easy Table Runner Diy Project Drop Cloth Fabric Lemons Limes

Diy Bunting Tablecloth The Sweetest Occasion

How To Make A One Hour Table Runner 10 Minute Tutorial Pattern
Plain Old Kristi Sew An Easy Round Table Cloth

My Modern Domestic Life Easy Coated Cotton Tablecloth With Ball Fringe Tutorial
Related Posts


