How To Make A Table From Scaffold Boards
Creating a table from scaffold boards offers a robust and aesthetically pleasing addition to any home or workspace. Scaffold boards are inherently durable, possessing a rustic charm that fits well with various design styles, from industrial to farmhouse. This article provides a detailed, step-by-step guide on constructing a table using scaffold boards, covering material selection, preparation, assembly, and finishing techniques.
Material Selection and Preparation
The success of any woodworking project heavily relies on the quality and preparation of the materials used. Scaffold boards, though readily available, require careful selection and thorough preparation before construction can begin. Understanding the types of wood typically used for scaffold boards and the necessary preparation process ensures the creation of a durable and visually appealing table.
Scaffold boards are often made from softwood, primarily pine or spruce. These woods are chosen for their strength-to-weight ratio and affordability. However, due to their intended use in construction, scaffold boards can be rough, contain imperfections, and have remnants of cement, paint, or other building materials. Therefore, careful inspection and preparation are crucial.
When selecting scaffold boards, prioritize boards that are straight and free from significant warping or splitting. Minor imperfections are acceptable and can often be incorporated into the table's rustic aesthetic. However, avoid boards with deep cracks, significant rot, or extensive damage. Check for the presence of metal banding or remnants of nails or screws, as these can damage tools during the cutting and sanding process.
Once the boards are selected, the preparation process begins. The initial step involves removing any embedded debris. A stiff brush, scraper, and possibly a mild detergent can be used to clean the boards. Stubborn materials like dried cement might require soaking or the use of specialized solvents, always adhering to safety precautions outlined on the product label.
After cleaning, the boards require sanding. This process smooths the surface, removes splinters, and prepares the wood for finishing. Begin with a coarse grit sandpaper (e.g., 80-grit) to remove the initial roughness and imperfections. Progress gradually to finer grits (e.g., 120-grit, then 220-grit) to achieve a smooth and even surface. Using a power sander, such as an orbital sander, significantly speeds up this process. For areas difficult to reach with a power sander, hand sanding is recommended.
Following sanding, the boards should be thoroughly cleaned to remove any remaining sawdust. A vacuum cleaner with a brush attachment is effective for this purpose. Alternatively, a tack cloth can be used to wipe down the boards, ensuring a clean surface for subsequent finishing processes.
If the boards are to be cut to specific lengths, this should be done after sanding. Accurate measurements are essential for a well-proportioned table. A circular saw or a hand saw can be used for cutting, depending on the desired precision and available tools. Ensure the cuts are square and clean to facilitate a seamless assembly.
Finally, consider the treatment of the boards to prevent insect infestation or fungal growth, especially if the table will be used outdoors or in humid environments. Wood preservatives can be applied to protect the wood from these threats. Always follow the manufacturer's instructions and safety guidelines when using wood preservatives.
Table Design and Assembly
The design of the table dictates its functionality and aesthetic appeal. Careful consideration of the table's intended use, dimensions, and style is essential before commencing the assembly process. Various table designs can be achieved using scaffold boards, ranging from simple rectangular tables to more complex designs with extensions or storage features. This section focuses on a basic rectangular table design, outlining the steps involved in its assembly.
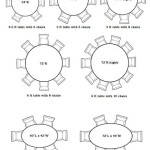
The first step in the assembly process is determining the desired dimensions of the table. These dimensions will influence the number and length of the scaffold boards required for the tabletop. A typical table width ranges from 70 cm to 90 cm, while the length can vary depending on the available space and intended use. The height of the table is typically between 70 cm and 75 cm.
Once the dimensions are determined, the scaffold boards need to be arranged to form the tabletop. The boards can be joined together using various methods, including screws, dowels, or metal connectors. Screws are the most common and straightforward method. To ensure a strong and stable connection, the boards should be joined from the underside using wood screws. Pre-drilling pilot holes is essential to prevent the wood from splitting during screwing.
To further enhance the stability of the tabletop, consider adding support battens to the underside. These battens should run perpendicular to the scaffold boards and be evenly spaced along the length of the table. The battens can be attached using screws and wood glue. Wood glue provides an additional layer of bonding and helps to prevent the screws from loosening over time.
The table legs can be made from various materials, including wood, metal, or pre-fabricated table legs. Wooden legs can be constructed from timber, such as pine or oak, and attached to the underside of the tabletop using screws and metal brackets. Metal legs provide a more industrial aesthetic and can be purchased in various styles and sizes. Pre-fabricated table legs are a convenient option and are readily available in various designs and materials.
When attaching the table legs, ensure they are positioned evenly and securely. Use a level to ensure the tabletop is level before tightening the screws. If the table legs are adjustable, make sure they are adjusted to the same height to prevent the table from wobbling. Metal brackets provide additional support and stability to the legs, especially for larger tables.
Once the tabletop and legs are assembled, inspect the table for any imperfections or unevenness. Sand down any rough edges or splinters and fill any gaps or cracks with wood filler. Allow the wood filler to dry completely before sanding it smooth. The table is now ready for the finishing process.
Finishing and Protection
The finishing process enhances the appearance of the table, protects the wood from moisture and wear, and extends its lifespan. Various finishing options are available, each offering different aesthetic and protective qualities. The choice of finish depends on the desired look and the intended use of the table.
Before applying any finish, ensure the table surface is clean and free from dust. Lightly sand the surface with a fine-grit sandpaper (e.g., 220-grit) to create a smooth and even base for the finish. Remove any sanding dust with a tack cloth.
One popular finishing option is applying a wood stain. Wood stain enhances the natural wood grain and adds color to the table. Various colors and types of wood stains are available, ranging from light natural tones to rich dark hues. Apply the wood stain evenly using a brush or cloth, following the manufacturer's instructions. Allow the stain to dry completely before applying a protective topcoat.
Another option is to apply a clear varnish or lacquer. Varnish and lacquer provide a durable and protective coating that resists scratches, water damage, and UV exposure. These finishes are available in various sheens, ranging from matte to gloss. Apply the varnish or lacquer in thin, even coats, allowing each coat to dry completely before applying the next. Lightly sand between coats to ensure a smooth finish.
For a more natural and rustic look, consider applying a wax or oil finish. Wax and oil finishes penetrate the wood, providing protection from within. These finishes enhance the natural wood grain and create a soft, smooth surface. Apply the wax or oil liberally using a cloth, allowing it to soak into the wood. Wipe off any excess finish after a few minutes. Reapply the wax or oil periodically to maintain the protection and appearance of the table.
Regardless of the chosen finish, it is essential to apply multiple coats for optimal protection. Pay particular attention to the edges and corners of the table, as these areas are more susceptible to wear and damage. Allow the finish to cure completely before using the table.
To further protect the table from spills and stains, consider using placemats and coasters. Avoid placing hot objects directly on the table surface, as this can damage the finish. Regularly clean the table with a damp cloth and mild detergent. Avoid using abrasive cleaners, as they can scratch the finish. With proper care and maintenance, a scaffold board table can provide years of enjoyment.

Makeover A Dining Table Made From Scaffold Boards Roses And Rolltops
.jpg.aspx?strip=all "How To Make A Table Out Of Scaffold Boards Upcycling Safe")
How To Make A Table Out Of Scaffold Boards Upcycling Safe
.jpg.aspx?strip=all "How To Make A Table Out Of Scaffold Boards Upcycling Safe")
How To Make A Table Out Of Scaffold Boards Upcycling Safe

How To Make An Industrial Rustic Scaffold Board Dining Table And Bench

Diy Scaffold Board Dining Table And Bench

How To Make A Table Out Of Scaffold Boards Upcycling Safe

How To Build A Scaffold Board Table Prevent Cupping

How To Make A Table Out Of Scaffold Boards Upcycling Safe

How To Build Your Own Scaffold Board Desk

Diy How To Make Your Own Outdoor Seat From Scaffolding Planks My Thrifty Life By Cassie Fairy Inspiration For Living A Lovely On Budget
Related Posts