How To Make A Table Runner With Border
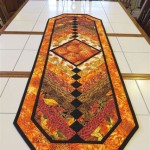
A table runner is a decorative and functional element that enhances the appearance of a table. It can protect the table surface, add a touch of color, and tie together the overall design of a room. A table runner with a border elevates this simple accessory, providing a more refined and tailored look. This article provides a comprehensive guide on how to create a table runner with a border, covering material selection, measurement techniques, sewing procedures, and finishing touches.
Selecting Materials and Tools
The first key step in crafting a table runner with a border involves carefully selecting the appropriate materials and gathering the necessary tools. The chosen fabrics will significantly impact the final aesthetic and durability of the runner. The tools required will ensure precision and efficiency throughout the construction process.
Fabric Selection: Consider the overall style and color scheme of the dining area or the space where the table runner will reside. Durable fabrics such as cotton, linen, or a cotton-linen blend are excellent choices for the main body of the runner. These materials are relatively easy to work with, offer good stain resistance, and can withstand regular washing. For the border, a complementary or contrasting fabric can be selected. Silk, velvet, or a patterned cotton fabric can add a touch of elegance and visual interest. The weight of the fabric should be compatible; avoid using a very heavy fabric for the border if the main body is lightweight.
Border Considerations: The width of the border is a matter of personal preference, but a general guideline is to choose a width that is proportional to the size of the table runner. A border that is too narrow may get lost, while one that is too wide might overwhelm the main body of the runner. A width between 2 to 4 inches is a common and aesthetically pleasing choice. Bias tape can also be used as a border, adding a professional and clean finish. Pre-made bias tape is readily available in various colors and sizes, simplifying the border application process.
Interfacing (Optional): If the chosen fabrics are lightweight or lack structure, consider using interfacing to give the table runner more body and prevent it from wrinkling easily. Interfacing is a fusible or sew-in material that is applied to the back of the fabric, adding stiffness and stability. Select an interfacing weight that is appropriate for the fabric; a lightweight interfacing will work well with delicate fabrics, while a heavier interfacing is suitable for more substantial materials.
Tools: The following tools are essential for making a table runner with a border:
* Sewing Machine: A reliable sewing machine is fundamental for stitching the fabric pieces together and creating a durable seam.
* Scissors or Rotary Cutter: Sharp scissors or a rotary cutter with a cutting mat are needed for precise fabric cutting.
* Measuring Tape or Ruler: Accurate measurements are crucial for ensuring the table runner is the correct size and shape.
* Pins: Pins are used to hold the fabric pieces together securely before sewing.
* Iron and Ironing Board: An iron is essential for pressing seams and creating crisp edges.
* Marking Pen or Chalk: A fabric marking pen or chalk is used to transfer pattern markings and sew lines onto the fabric.
* Seam Ripper: A seam ripper is useful for correcting mistakes and removing unwanted stitches.
Cutting Fabric and Preparing Border Pieces
This process involves accurately cutting the fabric pieces according to the desired dimensions of the table runner and its border. Precise cutting ensures that the finished product has clean lines and a professional appearance.
Determining Dimensions: The length of the table runner should be approximately one-third to two-thirds the length of the table. This allows the runner to drape gracefully over the edges without completely covering the tabletop. The width of the runner is a matter of personal preference, but a common range is between 12 and 18 inches. Once the desired length and width of the finished runner are determined, add seam allowances to all edges. A standard seam allowance is 1/2 inch.
Cutting the Main Body: Using a measuring tape or ruler and a fabric marking pen or chalk, mark the dimensions of the main body of the table runner onto the chosen fabric. Cut along the marked lines using sharp scissors or a rotary cutter. Ensure that the fabric is lying flat and taut during the cutting process to prevent distortion.
Calculating Border Dimensions: The border pieces need to be cut to the correct length and width to fit around the main body of the runner. To calculate the length of the side border pieces, measure the length of the main body and add 1 inch for seam allowances (1/2 inch on each end). To calculate the length of the top and bottom border pieces, measure the width of the main body plus the width of the side border pieces (already sewn onto the main runner) and adding 1 inch for seam allowances. The width of all four borders should be the desired width, plus 1 inch for seam allowances (1/2 inch on the top and bottom edges). Cut the border fabric into four strips according to these dimensions.
Ironing the Border Pieces: Before attaching the border to the main body, it is helpful to press the long edges of each border piece to the wrong side by 1/2 inch. This creates a clean, finished edge and makes it easier to align the border with the main body. Use an iron and ironing board to press the edges precisely and evenly.
Applying Interfacing (If Needed): If using interfacing, cut the interfacing to the same dimensions as the main body of the table runner. Fuse or sew the interfacing to the wrong side of the main body fabric according to the manufacturer's instructions. This will add structure and stability to the runner.
Sewing and Finishing Techniques
The final stage involves sewing the border pieces to the main body of the table runner and finishing the edges for a polished and professional look. Accurate stitching and careful attention to detail are essential for achieving a high-quality result.
Attaching the Side Borders: Place one side border piece on top of the main body of the runner, with the right sides facing each other. Align the raw edges of the border piece with the raw edge of the main body. Pin the border piece in place along the entire length of the edge. Sew the border piece to the main body using a 1/2 inch seam allowance. Repeat this process for the other side border piece.
Attaching the Top and Bottom Borders: After attaching the side borders, attach the top and bottom border pieces in the same manner. Place one top or bottom border piece on top of the main body (with the already attached side borders), with the right sides facing each other. Align the raw edges of the border piece with the raw edges of the main body and the side borders. Pin the border piece in place along the entire length of the edge. Sew the border piece to the main body using a 1/2 inch seam allowance. Repeat this process for the remaining top or bottom border piece.
Pressing the Seams: Once all the border pieces have been sewn in place, press the seams open using an iron. This will help to reduce bulk and create a flatter, more professional finish. Press the seams towards the border fabric for a clean look.
Mitering Corners (Optional): Mitering the corners of the border can enhance the runner's appearance. To miter the corners, fold the runner diagonally at each corner with the right sides together. Mark a line at a 45-degree angle from the corner point to the seam line. Sew along this marked line. Trim the excess fabric, leaving a 1/4 inch seam allowance. Turn the corner right side out and press. This creates a neat, mitered corner.
Finishing the Edges: To finish the edges of the table runner, several options can be considered. One common method is to turn the raw edges to the wrong side by 1/4 inch and then fold them over again by 1/4 inch, creating a double-folded hem. Pin the hem in place and sew it along the entire perimeter of the runner using a straight stitch or a decorative stitch. Another option is to use bias tape to bind the edges of the runner. Pre-made bias tape can be purchased in various colors and patterns. Attach the bias tape to the edges of the runner using a sewing machine or by hand stitching.
Adding Embellishments (Optional): Embellishments can be added to further customize the table runner. Consider adding decorative stitching along the border edges, attaching tassels or fringe to the corners, or embroidering a design onto the main body of the runner. These embellishments can add a personal touch and enhance the overall aesthetic of the table runner.

How To Make A Table Runner With Border Step By Sewing Tutorial

How To Make A Table Runner With Border Step By Sewing Tutorial

Easy Borders Add Zz To A Table Runner

Diy Table Runner

Make A Stunning Runner From Pretty Border Print Quilting Digest

One Hour Table Runner Tutorial Complete Step By Instructions

How To Make A Table Runner With Border Step By Sewing Tutorial Spring Projects

Easy Borders Add Zz To A Table Runner

10 Minute Table Runner The Sewing Room Channel

How To Sew A Table Runner 14 Steps With Pictures Wikihow
Related Posts