How to Make Table Mats with Cardboard
Cardboard, a readily available and inexpensive material, can be transformed into stylish and functional table mats with a little creativity and effort. This guide provides a step-by-step process for creating your own cardboard table mats, exploring various design options, and enhancing their durability and aesthetics.
Choosing Cardboard and Design
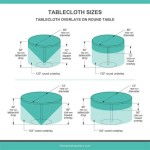
The first step in crafting cardboard table mats is selecting the appropriate cardboard. Corrugated cardboard, with its fluted structure, offers excellent rigidity and thickness. However, smooth cardboard can also be used for decorative mats with intricate designs. Consider the thickness of the cardboard, as thicker cardboard will provide greater durability. When choosing a design, consider the intended use of the table mats. A simple rectangular design is suitable for everyday use, while more intricate patterns can enhance special occasions or themed dining experiences.
The design can be as simple or complex as desired. Simple designs can be achieved using geometric shapes or basic patterns. More intricate designs can be created using stencils, freehand drawing, or even combining different cardboard textures. For a rustic look, consider using natural materials like burlap or twine to embellish the mats. To achieve a more polished look, use paint, markers, or fabric to add color and patterns.
Creating the Table Mat
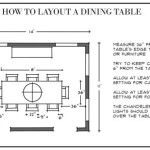
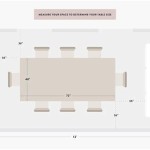
Once the cardboard and design are chosen, create the desired shape and size of the table mat using a ruler, pencil, and scissors. For rectangular or square mats, measure and cut the cardboard to the desired dimensions. For more intricate designs, use a stencil or freehand drawing to mark the outline on the cardboard and carefully cut it out. It is recommended to use a sharp craft knife for intricate cutting, ensuring smooth and precise edges.
Adding Durability and Aesthetics
To enhance the durability and aesthetics of the cardboard table mats, consider adding protective coatings or decorative elements. To protect against spills and wear, apply a layer of varnish or sealant over the cardboard surface. This creates a smooth and waterproof finish that prevents stains and damage.
To add a decorative touch, consider using fabric, paper, or other materials to cover the cardboard. This technique can add texture, color, and patterns to the mats. Glue or adhere the chosen material onto the cardboard surface, ensuring a secure and even application.
For a further touch of personalization, consider adding embellishments like buttons, beads, or ribbons to the table mats. These elements can add a unique visual appeal and enhance the overall design.
Final Touches and Care
Once the decorative elements are applied, allow the adhesive or sealant to dry completely. Then, carefully trim any excess material and ensure all edges are smooth and even. For a professional finish, use a sanding block to smooth any rough edges.
To care for your cardboard table mats, avoid exposing them to excessive moisture or heat. Clean them with a damp cloth and mild soap. To prevent damage, store the mats in a dry and cool place when not in use. With proper care, cardboard table mats can provide a unique and sustainable addition to any dining setting.

3 Ways To Make Placemats By Weaving Paper Strips Wikihow

How To Make A Paper Mat With Papers Easy Crafts Arts Colour

How To Make Origami Mat Paper

3 Ways To Make Placemats By Weaving Paper Strips Wikihow

Diy Table Mat Making With Paper Weaving Papermat Carpet Out Of

3 Ways To Make Placemats By Weaving Paper Strips Wikihow

Woven Circle Mat Diy A Beautiful Mess

How To Weave Paper Place Mats Friday Fun For Kids Aunt Annie S Crafts

How To Weave Paper Place Mats Friday Fun For Kids Aunt Annie S Crafts

3 Ways To Make Placemats By Weaving Paper Strips Wikihow
Related Posts