How to Make a Table Runner at Home
A table runner serves as a decorative accent that enhances the visual appeal of a dining table, coffee table, or console table. Creating a table runner at home offers a customizable and cost-effective alternative to purchasing one. The project allows for the selection of fabrics, colors, and patterns that perfectly complement an existing home decor scheme. This article provides a step-by-step guide on constructing a table runner at home, from selecting materials to the finishing touches.
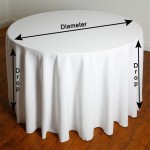
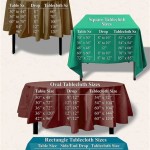
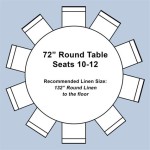
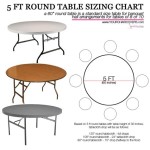
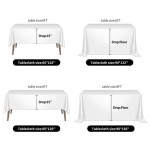
Before commencing the project, careful consideration should be given to the desired dimensions of the table runner. Standard table runner widths typically range from 12 to 16 inches. The length depends on the size of the table it will adorn and the desired overhang. A common guideline is to allow for a 6-12 inch overhang on each end of the table. Accurately measuring the table and calculating these dimensions is crucial for achieving a well-proportioned and aesthetically pleasing result.
Selecting the Appropriate Fabric
The choice of fabric is fundamental to the overall look and durability of the table runner. The selection should consider factors such as the intended use, the level of formality, and the ease of maintenance. Cotton and linen are popular choices due to their versatility, affordability, and ease of washing. These fabrics are well-suited for everyday use and can be found in a wide range of colors and patterns. For a more formal setting, fabrics such as silk, velvet, or damask offer a luxurious and elegant appeal.
When selecting fabric, it's important to consider its weight and drape. A heavier fabric will provide a more substantial feel and will drape nicely over the table edges, while a lighter fabric may require interfacing to prevent it from being too flimsy. Furthermore, the fabric's pattern repeat should be taken into account, especially when cutting multiple pieces or creating a symmetrical design. It is advisable to purchase slightly more fabric than initially calculated to allow for errors or design adjustments.
Pre-washing the selected fabric is an essential step to prevent shrinkage after the table runner is completed. Different fabrics have different pre-treatment needs. Cotton and linen benefit from being washed and dried on a hot setting. Delicate fabrics like silk or velvet should be dry-cleaned or hand-washed according to the manufacturer's instructions. Failure to pre-wash can result in distortion and an ill-fitting table runner after its first wash.
Cutting and Preparing the Fabric
Once the fabric has been pre-washed and ironed, it is ready to be cut. A rotary cutter, cutting mat, and ruler are recommended for achieving precise and clean cuts. These tools provide greater accuracy than using scissors alone. Mark the desired dimensions on the fabric using a fabric marker or tailor's chalk. Ensure that the lines are straight and consistent to avoid skewed edges.
For a simple rectangular table runner, cut a single piece of fabric according to the determined dimensions. If a more complex design is desired, such as using multiple fabrics or adding borders, cut separate pieces accordingly. When cutting multiple pieces, ensure that the pattern alignment is consistent across all pieces to create a cohesive and professional look. It may be necessary to use pattern weights to hold the fabric in place while cutting, especially when working with slippery or delicate materials.
If using interfacing, cut it to the same dimensions as the main fabric or the specific areas requiring reinforcement. Fusible interfacing can be ironed onto the back of the fabric, while sew-in interfacing needs to be stitched in place. The type of interfacing chosen will depend on the desired level of stiffness and the fabric being used.
Sewing the Table Runner
With the fabric cut and prepared, the next step is to sew the table runner together. This involves creating a hem around the edges to prevent fraying and to provide a clean, finished look. A basic hem can be created by folding the raw edge of the fabric over twice, pressing it with an iron, and then stitching it in place using a straight stitch on a sewing machine. The width of the hem can be adjusted to suit personal preference, but a common width is between 1/4 inch and 1/2 inch.
For a more decorative hem, consider using a blind hem stitch or a rolled hem stitch. A blind hem stitch is virtually invisible from the front of the fabric, while a rolled hem stitch creates a delicate and refined edge. These stitches require a sewing machine with the appropriate settings and may necessitate some practice to master.
If the table runner design involves multiple fabric pieces, begin by sewing them together along their edges. Use a straight stitch and ensure that the seam allowance is consistent throughout. After sewing the pieces together, press the seams open to reduce bulk and create a smoother surface. Topstitching along the seams can further enhance the appearance and durability of the table runner.
When adding decorative elements such as trim, lace, or fringe, these should be attached before the final hemming. Pin the trim in place along the edges of the table runner, ensuring that it is evenly spaced and aligned. Use a straight stitch or a decorative stitch to secure the trim to the fabric. Take care to avoid puckering or stretching the fabric during this process.
For those without a sewing machine, a table runner can be created by hand-sewing. While more time-consuming, hand-sewing allows for greater control and precision, especially when working with delicate fabrics or intricate designs. A simple running stitch or back stitch can be used to create the hem and to join multiple fabric pieces. Ensure that the stitches are small and evenly spaced to create a durable and professional-looking finish.
Another no-sew alternative involves using fusible webbing, a heat-activated adhesive that bonds fabric together. Apply the fusible webbing along the edges of the fabric and then iron it in place according to the manufacturer's instructions. This method is quick and easy, but it may not be as durable as sewing. It is best suited for table runners that will not be subjected to frequent washing or heavy use.
Adding Finishing Touches
The final step in creating a table runner is to add finishing touches that enhance its overall appearance. This may involve pressing the finished table runner to remove any wrinkles or creases. Use an iron on the appropriate setting for the fabric being used and consider using a pressing cloth to protect delicate materials.
Consider adding embellishments such as decorative stitching, embroidery, or appliques to personalize the table runner. These additions can be applied by hand or using a sewing machine. Experiment with different thread colors and stitch patterns to create a unique and eye-catching design.
Another finishing touch is to add tassels or pom-poms to the ends of the table runner. These can be purchased pre-made or created at home using yarn or thread. Attach the tassels or pom-poms securely to the corners of the table runner using hand stitches or a sewing machine. This adds a playful and decorative element to the finished product.
Once the table runner is complete, inspect it carefully for any loose threads or imperfections. Trim any stray threads and make any necessary adjustments to ensure that the edges are neat and even. Now the handmade table runner is ready to use and enjoy.

Beginners Table Runner Very Detailed Instructions

How To Make A Reversible Table Runner For Beginners

Quick And Easy Diy Table Runner Positively Splendid Crafts Sewing Recipes Home Decor

How To Make A Quick And Easy Table Runner With Strips Quilting

How To Make Table Runner At Home स ड बन ए ख बस रत ट बल रनर Diy

How To Make A Table Runner Just Fabrics

Make An Easy Star Quilt Table Runner Joyous Home

How To Sew A Ten Minute Table Runner Sewing 4 Free

How To Make Runner At Home From Old Kurti 30 Min Table Shresth Kitchen

How To Make An Easy Table Runner For Your Dining Room Our Little Handmade Home
Related Posts