How to Measure a Rectangle Table Accurately
Measuring a rectangle table is a fundamental skill applicable in various situations, from purchasing tablecloths and furniture covers to planning room layouts and creating custom furniture. Accurate measurements ensure that chosen accessories fit properly, space is utilized efficiently, and custom projects proceed smoothly. This article outlines a step-by-step guide to measuring a rectangle table accurately, providing essential tips and considerations for achieving precise results.
Before commencing the measurement process, it is crucial to gather the necessary tools. These tools contribute to the accuracy and ease of the measuring procedure. A reliable measuring tape, preferably one that is retractable and clearly marked in both inches and centimeters, is essential. A secondary tool is a straight edge, such as a ruler or yardstick, which can assist in ensuring that measurements are taken along straight lines. Finally, paper and a pen or pencil are vital for recording the measurements as they are taken. Avoiding reliance on memory alone minimizes errors and provides a reference point throughout the process.
Key Point 1: Determining the Length
The length of a rectangle table is generally considered to be its longest dimension. Accurately determining this length is fundamental to any subsequent calculations or applications. The proper technique for measuring the length involves several key steps.
Begin by identifying the two longest edges of the table. These edges will define the length of the rectangle. Position the measuring tape at one end of the table, ensuring it is aligned precisely with the edge. Extend the tape along the entire length of the table, keeping it taut and straight. Avoid any slack or curves in the tape, as these can introduce inaccuracies into the measurement.
At the opposite end of the table, note the measurement indicated on the tape. It is important to read the measurement from the same point on the table edge where the tape was initially positioned. Observe the units of measurement being used (inches or centimeters) and record the measurement clearly on the paper. For example, "Length: 72 inches" or "Length: 183 centimeters."
To ensure accuracy, it is advisable to repeat the measurement. Conduct a second measurement along the same edge, following the same procedure. Compare the two measurements. If they are identical, confidence in the accuracy of the measurement is increased. If there is a discrepancy, repeat the measurement a third time and use the measurement that appears most consistently. Small variations may occur due to minor imperfections in the table edge or slight differences in tape positioning.
When dealing with a table that has rounded edges or decorative features extending beyond the main surface, the measurement should be taken to the furthest point along the longest axis. This ensures that tablecloths or covers will adequately accommodate the entire table surface. If the table has an overhang or a lip, specify whether the measurement includes the overhang or is just of the main table surface in the notes you take.
Key Point 2: Determining the Width
The width of a rectangular table is its shorter dimension. Measuring the width accurately is as critical as measuring the length, ensuring an accurate representation of the table's overall size. The procedure for measuring the width mirrors that of the length, with careful attention paid to alignment and consistency.
Identify the two shorter edges of the table. These edges define the width of the rectangle. Position the measuring tape at one end of the table’s width, ensuring it is aligned precisely with the edge. Extend the tape along the entire width of the table, keeping it taut and straight. Again, avoid slack or curves in the tape, which can compromise the accuracy of the measurement.
At the opposite end of the table, note the measurement indicated on the tape. As with the length measurement, read the measurement from the same point on the table edge where the tape was initially positioned. Clearly record the measurement on the paper, specifying the units used. For example, "Width: 36 inches" or "Width: 91 centimeters."
Repeat the measurement to verify accuracy. Conduct a second measurement along the same edge, following the same procedure. Compare the two measurements. If they are identical, confidence in the accuracy of the measurement is established. If there is a discrepancy, repeat the measurement once more and use the measurement that appears most frequently. Minor variations may occur due to slight imperfections in the table edge or differences in tape positioning.
Similar to measuring the length, when measuring the width of a table with rounded edges or decorative features extending beyond the main surface, take the measurement to the furthest point along the shortest axis. This ensures complete coverage when using tablecloths or covers. Accurately note the dimensions of the table's legs and location, if they significantly impact the cover or tablecloth.
If the table's width differs across its length (for example, if it’s slightly tapered), multiple width measurements should be taken at different points along the length. This will provide a more comprehensive understanding of the table's shape and ensure that accessories are appropriately sized to accommodate any variations in width.
Key Point 3: Addressing Potential Challenges and Considerations
While the basic procedure for measuring a rectangle table is straightforward, certain challenges and considerations can arise that require specific attention to ensure accuracy. These include dealing with uneven surfaces, accommodating table leaf inserts, and accounting for decorative edges or overhangs.
Uneven Surfaces: If the table is placed on an uneven surface, such as a carpet or an irregular floor, it may not be perfectly level. This can introduce errors into the measurement. To mitigate this, ensure that the table is placed on a level surface before measuring, or use a level to verify that the table is horizontal. If leveling is not possible, take multiple measurements at different points along the edges and average the results. This helps to minimize the impact of any unevenness on the overall accuracy.
Table Leaf Inserts: Many rectangle tables have leaf inserts that can be added or removed to adjust the table's length. When measuring a table with leaf inserts, it is crucial to specify whether the measurements are taken with the leaf inserted or removed. Measure the table both with the leaf inserted and with the leaf removed, recording both sets of measurements. This provides complete information for selecting appropriate tablecloths or covers for both configurations. Also, measure the leaf itself to understand its individual contribution to the length.
Decorative Edges or Overhangs: Tables with decorative edges, such as beveled edges or ornate trim, require special attention when measuring. Ensure that the measurement includes the entire decorative edge, as this will affect the overall size of the tablecloth or cover needed. If the decorative edge is particularly elaborate, it may be helpful to create a simple sketch of the table, noting the dimensions of the main surface and the extent of the decorative edge. This visual aid can help to avoid errors when ordering accessories. If the overhang is substantial, take measurements from the floor to the bottom of the overhang as this may impede chairs and legroom.
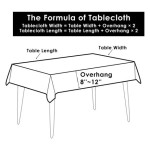
Accuracy and Precision: While aiming for the highest degree of accuracy is essential, it's also important to consider the practical implications of the measurements. For example, when purchasing a tablecloth, rounding up to the nearest inch or two may be more practical than specifying an exact measurement. Most textiles have some give or take. This provides a small margin of error and ensures that the tablecloth will fit comfortably. However, when designing custom furniture or planning a room layout, precise measurements are critical to avoid costly mistakes.
Understanding the intended use of the measurements will inform the level of precision required. For some projects, rounding to the nearest centimeter may be sufficient, while for others, measurements down to the millimeter may be necessary. Consider asking the manufacturer or supplier of the item you intend to buy what their margin of error is and add that to your calculations. This proactive approach helps ensure that the final product meets the required specifications.
Finally, it is always recommended to double-check all measurements before making any decisions based on them. Review the recorded measurements against the table itself to ensure that there are no obvious errors. If possible, have another person verify the measurements independently. A fresh set of eyes can often catch mistakes that may have been overlooked during the initial measurement process. By taking these precautions, the likelihood of errors is significantly reduced, and the accuracy of the measurements is maximized.

How Do I Measure My Table To Order A Glass Top

How To Pick A Table Guide Including Dimensions

Measuring Yardage For A Tablecloth Ofs Maker S Mill

What Size Patio Umbrella Do I Need For Rectangular Table

What Size Tablecloth Do I Need Deconovo Us

How Do I Calculate The Right Linen Size For A Rectangular Table Party Al Ltd

How To Choose The Correct Size Tablecloth For Your Table

How To Measure For A Tablecloth 2 Easy Methods

Tablecloth Size Calculator Williams Sonoma Taste

Measuring Instructions
Related Posts